In the previous post we saw baiscs about java 9 modules like, what is module, how to create module project, module descriptor file and so on. In this blog we will learn how to compile and run java9 module program.

Recommended read: Java 9 module details: part 1

Table of content

Java9 Module example for hello world

Before going further let's take an example of hello world module,

Let's dive deeper with an example, for better understanding we will create two modules. We will put the modules under the folder 'project'.

First module, we will create is 'com.module.util' module. In this module we will create module-info.java and Greeting.java files.
Second module will be 'com.module.app' module. In this module we will create module-info.java and Main.java files.

Let's create two folders for modules as 'com.module.util' and 'com.module.app' in the 'project' folder. These modules contain files Greeting.java and Main.java respectively. Both modules will have module-info.java at top level as shown below.

D:.
├───project
│   ├───com.module.app
│   │   │   module-info.java
│   │   └───com
│   │       └───module
│   │           └───app
│   │                  Main.java
│   │
│   └───com.module.util
│       │   module-info.java
│       └───com
│           └───module
│               └───util
│                      Greeting.java

Note: com.module.util and com.module.app are the folder names

Code for the 'Greeting.java' in 'com.module.util' module is as below,

module com.module.util{

exports com.module.util;

}

package com.module.util;

public class Greeting{

public static String getMessage(){

return "Have a nice day";

}

public static void main(String[] args){

System.out.println("Greeting class is working");

}

}

Code for the 'Main.java' in 'com.module.app' module is as below,

module com.module.app{

requires com.module.util;

}

package com.module.app;

import com.module.util;

public class Main{

public static void main(String[] args){

System.out.println(Greeting.getMessage());

}

}

How to compile and run module java program

Now we will see how to run and compile module program. Even if some of the commands look complex don't worry, once you understand they will be easy and simple.

How to compile and run java program without modules

Before looking into how to run java modular program, let's understand how to run java package program without using module-info.java file.

To separate out our source files and class files we will use '–d' option to set the destination directory for class files.

Let's assume we want to run the above Greeting class which is present in the package 'com.module.util'. And we will put the .class files under the 'libs' directory.

D:\project>javac -d libs com.module.util\com\module\util\Greeting.java

Once we execute the above command, we can see that the .class file is created under libs\com\module\util\Greeting.class

Now if we would like to run the main class created by above command, we have to specify path where jvm can find class files. Since our classes are present under libs folder we can specify path using –cp or -classpath.

D:\project>java -cp libs com.module.util.Greeting

OUTPUT

Greeting class is working

Compile and run java 9 module program

Now we have seen how to run java package program and put the classes into separate folder, to avoid mixing .java and .class files. We will use -d option for modular program as well.

Most important thing to remember is that, while compiling module, we have to compile .java source files and module descriptor file(module-info.java) .

In windows path are separated by semi-colon(;) and in Linux and mac using colons(:)

Most important new argument options

There are few new parameters/argument types introduced in java 9 for running the modular program that we must know.

  1. module-path: Module-path option is used to specify where the modules are located. It is used at compile and run time.
    • At compile time it is used with javac option to specify path where the dependent modules can be found.
      Syntax : javac --module-path path1;path2
    • At runtime it is used to specify dependent module and module which is to run
      Syntax : java -module-path pathslist
      Note: we can use -p path as shortcut for --module-path path.
  2. module: The --module argument is used to compile list of modules or run a module.
    • Syntax : javac –module path1;path2
    • Syntax : java –module module/class
      Note: we can use -m as shortcut for –module.
  3. module-source-path: the argument --module-source-path us used to specify the root directory where the source files or packages are placed.
    Sometimes the projects are organized in such a way that the code is placed in special folder.
    For example src/main/java

Note: when we are using –module or –m option it is mandatory to use –module-source-path option, even if the source files are in same folder. 
  - - module-path == >  -p 
 - - module       == >  -m 

Example
D:\project> javac -d libs --module-source-path ./ --module com.module.app 
D:\project> java --module-path libs --module com.module.app/com.module.app.Main 

OUTPUT

Have a nice day

Different ways to compile and run java modules

1) We can specify all the files separated by space in javac command:

Warning: If you are using this option don’t compile multiple modules in same folder. Otherwise it will override module-info.class files

Syntax to compile:
javac –d outputDir --module-path requiredModulesPath moduleDir\module-info.java moduleDir\package\File1.java moduleDir\package1\package2\File2.java
Syntax to run:
java --module-path paths --module module/package.MainClass

Note: even in windows in java '/' is used as separator for module and class

Example to compile com.module.util module

D:\project> javac -d libs com.module.util\com\module\util\Greeting.java com.module.util\module-info.java

After this command we should see module-info.class and Greeting.class files are created

project
├───libs
│   │   module-info.class 
│   └───com 
│       └───module 
│           └───util 
│                  Greeting.class 

Now we can run and check our module using following command

D:\project> java --module-path libs --module com.module.util/com.module.util.Greeting

Greeting class is working

Now lets run the Main class from app module which is dependent on util module which is compiled in libs path.

D:\project> javac --module-path libs -d app com.module.app\com\module\app\Main.java com.module.app\module-info.java

D:\project>java --module-path app;libs --module com.module.app/com.module.app.Main

Have a nice day

2) We can specify module names instead of java files:

This is recommended option to compile the applications. If we use this option, we can compile multiple modules in single directory as separate folder for each module with module name is created.

Also if required modules are in the same folder, they are automatically compiled even if they are not specified

Syntax to compile:
javac –d outputDir --module-path requiredModulesPath --module-source-path rootOfSOurceFiles --module modulesToBeCompiles

Example

D:\project>javac -d libs --module-source-path ./ --module com.module.util,com.module.app

After executing above command, following classes are created

project 
├───libs 
│   ├───com.module.app 
│   │   │   module-info.class 
│   │   └───com 
│   │       └───module 
│   │           └───app 
│   │                   Main.class 
│   └───com.module.util 
│       │   module-info.class 
│       └───com 
│           └───module 
│               └───util 
│                       Greeting.class 
Syntax to run:
java --module-path requiredModulesPath --module module/package.MainClass

Example

D:\project>java --module-path libs --module com.module.app/com.module.app.Main

Have a nice day

Common mistakes in running modules

Let's assume we would like to run Main class from com.module.app module.
Com.module.app module is dependent on com.module.util module.
Com.module.util module is compiled in libs folder
Com.module.app module is compiled in app folder.

When required modules is not specified in module path

java --module-path app -m com.module.app/com.module.app.Main

Error java.lang.module.FindException: Module com.module.util not found, required by com.module.app

When module path of the module which is to be run is not specified in module path

java --module-path libs-m com.module.app/com.module.app.Main

Error: java.lang.module.FindException Module com.module.app not found

When we use the wrong slash(\) to run –correct way is module/class

java --module-path libs;app -m com.module.app\com.module.app.Main

Fast track reading

  • module-path: used to specify where the modules are located
  • module: used to specify modules list for compile or module to run
  • module-source-path: used to specify the root directroy where the source files or packages are places
  • If we use –-module or –m option it is mandatory to use –-module-source-path option
  • short codes -p can be used for –-module-path and -m for --module
  • Syntax to compile javac –d outputDir -p requiredModulesPath --module-source-path rootOfSOurceFiles -m modulesToBeCompiles
  • Run syntax: java -p requiredModulesPath -m module/package.MainClass

Frequently asked question FAQ:

What is Module resolution process?

When we run the module program, at start jvm checks for all required modules. This process of finding all modules at start is call as Module resolution process.
We can print modules scanning process log by using command –-show-module-resolution in the run command.
Note: in module resolution process first main module is searched then it keep adding required module in tree form.

What are the java restricted keyword or contextual keyword?

Newly added 10 keywords, which are considered as keyword only in case of Module descriptor file(module-info.java), are called as restricted keywords.
This keywords are open, module, requires, transitive, exports, opens, to, uses, provides, and with.
For backward compatibility in every other cases it is considered as identifiers. Unlike other keywords we can use this keywords is variables or method name.

What is module descriptor file?

From java 9, special file with name module-info.java is requied in root folder of module, which specifies the metadata of module, this file is called as module desciptor file.

Can we export multiple package in one line?

No, To export multiple packages separate exports keyword is required.

Can we add multiple modules dependancy using single requries keyword?

No for separate module new requires keyword is required.

Related topics

In this blog we will go through one of the most important features of java 9, which is 'Modules' aka 'Java Platform Module System (JPMS)'. We will understand everything about JPMS like, what is module? How it helps to add modules? and How to create and use module? Even if you don’t know anything about module don’t worry we got it covered.

If you are scared of this new word('Modules'), don’t worry once you understand it, it will be very easy.

Difference between JDK8 and JDK9

We all know that JRE is the most important part of JDK. But, since java 9, JDK does not contain the JRE folder 😮. Yes! that is true, because from java 9 JRE is converted to multiple small modules and they are present in folder called 'jmods'.

We can list system modules or the contents of this 'jmods' folder by using the command : java --list-modules.

Table of contents

What is a Java 9 Module?

Module system is a part of Jigsaw Project. It adds one more abstraction level above packages. In other words, it is a 'package of Packages' that makes our code even more reusable.
It is also fine to say that a module is a group of closely related packages, resources and module descriptor(module-info.java) file.

In Java 9 'java.base' is a base module. It does not depend on any other modules. By default, all modules including user defined modules are dependent on this module.

Even if we do not specify 'java.base' module, it will be imported automatically.

Features of java 9 Modules

  • Increases code reusability: by creating modules we can use them in different projects
  • Easy and meaningful grouping of packages: if we have many packages in one project it is difficult to manage and organize code, this is where modules come to the rescue
  • More abstraction to packages:we can decide which packages are allowed to be accessed outside and which are private or for internal use
  • Separation of resource: each module will have it's own required resource files like media or configuration files
  • Internal or secure classes can be hidden from outside world
java 9 module project structure

Steps to create Module

  1. Create a folder with module name. Generally company name in reverse with artifact name is used. eg: 'com.stacktraceguru.util'
  2. Add file with name 'module-info.java' in module root folder. This file is called as 'Module Descriptor' file
  3. Create java packages as per requirement
  4. Add classes as required under the created packages

What are the rules for creating Module?

  • Module name must be unique
  • Each module must have exactly one Module Descriptor file with name 'module-info.java'
  • Package names must be unique. Even in the different modules we cannot have same package names
  • We can add media and other resource files in the module
  • Each module will create one jar file. For multiple jars we need to create separate modules
  • One project can have multiple modules

Note: Module name should not end with digits

What are theModule types?

Depending on how the modules are used, they are categorised into 4 types,

  • System Modules: the modules from JDK and JRE. Can be listed using java ´--list-modules
  • Application Modules: all the modules created in an application to achieve a functionality
  • Automatic Modules: existing jar files which are not modules but are added to module path. When we add non module jars to module path, module with jar name is created.
    • By default exports all the packages
    • By default can access classes from all other modules
  • Unnamed Module: jars and classes added into the classpath. When we add jar or class to the classpath all these classes are added to the unnamed module
    • Only exports to other unnamed module and automatic module. This means, application modules cannot access these classes
    • It can access classes from all the modules

What is Module Descriptor file?

It is a file with name module-info.java, under the root module path. This file contains the module metadata information.

This is also java file which is compileable using javac command.

This file defines following things

  • Public packages: list of packages that current module exports using 'exports' keyword
  • Dependencies on other modules: list of other modules on which the current module is dependent on. This is done using 'requires' keyword 
  • Services offered: list of services that current module provides using 'provides' keyword
  • Services consumed: list of services that current module consumes using 'uses' keyword
  • Reflection permission: permission to specify if refection can be used to access private members using 'open' keyword

Note: Module descriptor file needs to export packages as by default all packages are private. Also, we can not use reflection on other module classes. We need to enable reflection in order to use reflection.

module com.module.util{ // module <module.name>
 exports com.module.util;
 requires java.sql;
 }

Exports

By default all the packages are private and we can make them public using exports keyword

Syntax

exports <packageToExport>;

Example

module com.module.util{
    exports com.module.package1;
    exports com.module.package2;
}

Rules to use export keyword:

  • only exports packages not classes
  • each package requires new exports keyword

Qualified export: Exports … To

This exports packages to only specific modules and not to all. It is also known as qualified export.

Syntax

exports <packageToExport> to <comma-separated module to grant access>;

Example

module com.module.util{
    exports com.module.package1;
    exports com.module.package2 to com.module.app;
    exports com.module.package3 to com.module.app, com.module.help;
}

In above case all modules can access com.module.package1, But only com.module.app can access com.module.package2 as well.

Requires

If a module needs to access packages exported from other modules, then these other modules must be imported using 'requires' keyword.

Only after specifying the module dependency using 'requires', the other module packages can be used.

Syntax

requires <module-to-access>;

Example

module com.module.app{
    requires java.sql;
    requires com.module.util;
}

Rules to use requires keyword:

  • only module can be specified for 'requires'. Packages cannot be specified
  • dependency of each module must be specified separately, with separate 'requires' keyword

Requires Static

Sometimes we need some modules during compile time only and they are optional at runtime. For example, testing or code generation libraries.

If we need compile time dependency that is optional at runtime then this dependency must be specified using 'requires static' keyword.

Syntax

requires static <module-to-access>;

Example

module com.module.app{
    requires static java.sql;
    requires com.module.util;
}

In this example java.sql is mandatory at compile time but optional at runtime. 

Requires Transitive

There is a possibility to grant access of the modules, on which our current module depends, to the module that uses our current module. The 'requires transitive' keyword helps to achieve this.

This means all the modules that are using our module will get the access to transitive dependency automatically.

Syntax

requires transitive <module-to-access>;

Example

module com.module.app{
    requires transitive com.module.util;
    requires java.sql;
}

So all other modules that are using com.module.app module can access the exported packages from com.module.util.

Uses

Using uses keyword we can specify that our module needs or consumes some service. Service is a interface or abstract class. It should not be an implementation class. 

Syntax

uses <service-required>;

Example

module com.module.util{
    uses com.util.PersonDataService;
}

Note: The most important thing to note here is that 'requires' adds a module dependency, whereas 'uses' specifies required service class. 

Provides … With

We can specify that our module provides some services that other modules can use.

Syntax

provides <service-provided> with <service-implementation-class> ;

Example

module com.module.util{
  provides com.util.PersonDataService with com.util.DbPersonServiceImpl;
 }

Open

Since java 9 encapsulation and security is improved for the reflection apis. Using reflection we were able to access even the private members of the objects.

From java 9 this is not open by default. We can although grant reflection permission to other modules explicitly.

open module com.module.util{
}

In this case all the packages from util module are accessible using reflection. 

Opens

If we do not want to open all the packages for reflection we can specify packages manually using 'opens' keyword.

module com.module.util{
    opens com.module.package1;
}

In this case only classes from package1 are accessible using reflection.

Opens … To

 Using 'opens ...to' keyword we can open reflection permission for specific packages to specific modules only.

module com.module.util{
  opens com.module.package1 to module.a, module.b, org.test.integration;
}

In this case only module.a, module.b, org.test.integration modules can access classes from package1 using reflection.

Note: If we need reflection access to the module, we can gain the access using command line option '–add-opens', even if we are not the owner of the module.

Aggregator Module

First of all, this is not a technical concept. It is just a convenience concept for developers to make there life easier.

Sometimes multiple modules require other multiple modules. Instead of adding these in every module descriptor, we can create one module that will add all the required dependency using 'transitive'. Then we just need to add dependency of this module wherever needed, this will add all the required modules transitive dependency. This common module is the 'Aggregator module'.

For example, we have 10 modules, modA to modJ. modP, modQ, modR needs all 10 modules, then we can create one common module as below,

module modulePQR{
  requires transitive modA;
  ....
  ...
  requires transitive modJ;
}

Then modules P, Q and R just need to add require for modulePQR

module modP{
  requires transitive modulePQR;
}

The module modulePQR is the Aggregator module.

Fast track reading

  • Java Platform Module System (JPMS) is a part of Jigsaw Project
  • From java 9, jre is converted to multiple small modules and they are present in folder 'jmods'
  • Module is a group of closely related packages, resources and module descriptor(module-info.java) file
  • Module names must be unique
  • Each module must have exactly one Module Descriptor file with name 'module-info.java'
  • Packages must be unique. Even in the different modules we cannot have same package
  • 4 Types of Modules: System Modules , Application Modules, Automatic Modules and Unnamed Module
  • Module descriptor file must specify requires modules, exported packages, Services offered, Services Consumed and Reflection permission
  • Exports : By default all the packages are private and we can make them public using exports Keyword
  • Requires : specify the module dependency
  • Only compile time dependency is specified using requires static
  • Requires Transitive: Means all the modules who are using our module will get the access to transitive dependency automatically,
  • Uses: specifies that our module needs or consumes some service
  • Provides … With: specifies that our module provides some services that other modules can use
  • Open reflection permission to other modules explicitly
  • Aggregator Module:- module which will add all the required dependencies using transitive

String manipulation is done most often while programming. Like removing spaces in or around the string text. This also known as 'strip'ping off spaces in the string. So up till now we are all aware of the different ways to remove spaces from string in java, namely trim, replaceAll. However, java 11 has made some new additions to these with methods like, strip, stripLeading , stripTrailing.

Majority of the times, we just use the trim method for removing spaces. We never stop and think is there may be a better way to suit our need? Sure, trim() works well for most of the cases, but there are many different methods in java. Each having its own advantages and disadvantages. How do we decide which method suits us best?

Well, in this blog we shall cover the different methods in detail.

    Different ways to remove spaces from string in java

  1. : Removing leading and trailing spaces from the string
  2. :(from java 11) Removes leading and trailing spaces from the string. Strip method is Unicode charset aware meanse it removes spaces haveing different unicode
  3. : Differences between trim and strip method
  4. :(from java 11) Removes white spaces only from the beginning of the string
  5. :(from java 11) Removes white spaces only from ending of the string
  6. : Replaces all target characters with new character. It will replace or remove all spaces leading, in between and trailing
  7. : Replaces all matched characters with new character. This method takes regular expression as input to identify target substring that needs to be replaced. It can be used to remove any conbination of spaces.
  8. : Differences between replace and replaceAll method
  9. : Replaces only first occurrence of target substring with new replacement string

Most important point to note is that in java a string object is immutable. It means we cannot modify a string, hence all the methods returns new string with all the transformations.

If you need to remove leading and trailing spaces the best option would be before java 11 trim() and from java 11 strip() method.

trim() method in java

trim() is the most commonly used method by java developers for removing leading and trailing spaces. For trim method space character means any character whose ASCII value is less than or equal to 32 (‘U+0020’).

Example of trim method to remove spaces:

public class StringTrimTest {

    public static void main(String[] args) {
        String string = "    String    with    space    ";
        System.out.println("Before trim: \"" + string +"\"");
        System.out.println("After trim: \"" + string.trim() +"\"");
   }
}

In CommandLineRunnerImpl  

status=running 

Before trim: "    String    with    space    "
After trim: "String    with    space"

strip() method Java 11

In the release of Java 11 new strip() method was added to remove leading and trailing spaces from String.

This method was added as there are various space characters according to Unicode standards having ASCII value more than 32(‘U+0020’). Ex: 8193(U+2001).

To identify these space characters, new method isWhitespace(int) was added from Java 1.5 in Character class. This method uses unicode to identify space characters. You can read more about unicode space characters here.

The strip method uses this Character.isWhitespace(int) method to cover wide range of white space characters and remove them.

Example of strip():

public class StringStripTest {
    public static void main(String[] args) {
        String string = "    String    with    space    ";
        System.out.println("Before strip: \"" + string+"\"");
        System.out.println("After strip: \"" + string.strip()+"\"");
    }
}

In CommandLineRunnerImpl  

status=running 

Before strip: "    String    with    space    "
After strip: "String    with    space"

Difference between trim and strip method in java

trim()strip()
From Java 1From Java 11
Uses codepoint(ASCII) valueUses Unicode value
Removes leading and trailing character(space)Removes leading and trailing character(space)
Removes characters having ASCII value less than or equal to ‘U+0020’ or '32'Removes all space characters according to unicode

Let's look at the example where we will use white space character higher than 32 (‘U+0020’) unicode.

public class StringTrimVsStripTest {
    public static void main(String[] args) {
        String string = '\u2001'+"String    with    space"+ '\u2001';
        System.out.println("Before: \"" + string+"\"");
        System.out.println("After trim: \"" + string.trim()+"\"");
        System.out.println("After strip: \"" + string.strip()+"\"");
   }
}

Output:

Before: " String with space "
After trim: " String with space "
After strip: "String with space"

In the above example we can see that trim method is unable to remove space character added by '\u2001' unicode character.

Note: If you are running on windows machine, you may not be able to see the similar output due to limited unicode set. You can use online compilers to run program. Some online compiler links are as below,
Java-8: https://www.jdoodle.com/online-java-compiler/
Java-11: https://www.tutorialspoint.com/compile_java_online.php

stripLeading() method Java 11

Added in Java 11, stripLeading() method removes all leading spaces from a String.

Similar to strip method stripLeading also uses Character.isWhitespace(int) for identifyng white spaces.

public class StringStripLeadingTest {
    public static void main(String[] args) {
        String string = "    String    with    space    ";
        System.out.println("Before: \"" + string+"\"");
        System.out.println("After : \"" + string.stripLeading()+"\"");
    }
}

Output:

Before: "    String    with    space    "
After : "String    with    space    "

stripTrailing() method Java 11

Added in Java 11, stripTrailing() method removes all ending spaces from a String.

Similar to strip method stripTrailing also uses Character.isWhitespace(int) for identifying white spaces.

public class StringStripTrailingTest {

    public static void main(String[] args) {
      String string = "    String    with    space    ";
      System.out.println("Before: \"" + string+"\"");
        System.out.println("After : \"" + string.stripTrailing()+"\"");
    }
}

Output:

Before:"    String    with    space    "
After :"    String    with    space"

replace(CharSequence target, CharSequence replacement):

Added from java 1.5, This method is used to replace each target substring with the specified replacement string.

This method replaces all matching target elements. Hence replace() method can be used to remove all spaces from a string.

Note: One more method replace(char oldChar, char newChar) is present in java string class. The only differences is that this method takes single character as target and replacement. We cannot use this method to remove space, because we cannot have empty character as replacement.

Example to remove all spaces from string

public class StringReplaceTest {
 
    public static void main(String[] args) {
        String string = "    String    with    space    ";
        System.out.println("Before : \"" + string + "\"");
        System.out.println("Replace: \"" + string.replace(" ", "") + "\"");
    }
}

Output:

Before  : "    String    with    space    "
Replace : "Stringwithspace" 

replaceAll (String regex, String replacement)

Added in java 1.4, this is one of the most powerful method for string manipulation. We can use this method for many purposes.

Using replaceAll() method we can replace each matching regular expression substring with the given replacement string. For example for removing all spaces, removing leading spaces, removing trailing spaces and so on.

We just need to create correct regular expression with correct replacement parameter. Some regular expression examples as below:

\s+Find all space
^\s+Find all spaces at line beginning
\s+$Find all spaces at line ending

Example to replacing spaces in string,

Note: In java to add '/'(slash) we have to use escape character so for "\s+" we have to use "\\s+"

public class StringReplaceAllTest {
    public static void main(String[] args) {
        String string = "    String    with    space    ";
        System.out.println("Before replaceAll : \"" + string+"\"");
        System.out.println("Replace all space : \"" + string.replaceAll(" ", "") + "\"");
        System.out.println("Replace all regex : \"" + string.replaceAll("\\s+", "") + "\"");
        System.out.println("Replace leading   : \"" + string.replaceAll("^\\s+", "") + "\""); 
        System.out.println("Replace trailing  : \"" + string.replaceAll("\\s+$", "") + "\"");
    }
}

Output:

Before replaceAll : "    String    with    space    "
Replace all space : "Stringwithspace"
Replace all regex : "Stringwithspace"
Replace leading   : "String    with    space    "
Replace trailing  : "    String    with    space"

As we can see that replaceAll() is pretty powerful method if we use it with proper regular expression.

Difference between replaceAll and replace method

replaceAll()replace()
From Java 1.4From Java 1.5
Accepts regular expression for target identificationAccepts string for target identification
Used for fix or dynamic string replacementUsed for fix string replacement
Removes characters having ASCII value less than or equal to ‘U+0020’ or '32'Removes all space characters according to unicode

replaceFirst(String regex, String replacement)

Added in java 1.4, replaceFirst method replaces only the first match of given regular expression with replacement string.

This method can be very useful if you just need to replace only one first occurrence. For example if we just need to remove leading spaces we can use "\\s+" or "^\\s+".

We can also use this method to remove trailing spaces by using "\\s+$" regular expression. As this expression will only match the last spaces in line. So last spaces are considered as the first match for this method.

Let's take an example for removing leading and trailing spaces from string

public class StringReplaceFistTest {
      public static void main(String[] args) {
      String string = "    String    with    space    ";
      System.out.println("Original text        : \"" + string+"\"");
        System.out.println("Updated text         : \"" + string.replaceFirst("space", "update") + "\"");
        System.out.println("Remove leading  space: \"" + string.replaceFirst("\\s+", "") + "\"");
        System.out.println("Remove trailing space: \"" + string.replaceFirst("\\s+$", "") + "\"");    }
}

Output

Original text        : "    String    with    space    "
Updated text         : "    String    with    update    "
Remove leading  space: "String    with    space    "
Remove trailing space: "    String    with    space"

Fast track reading :

Related topics

Most of the java developers get confused when it comes to the question that, is Java 'pass-by-value' or 'pass-by-reference'.

The answer is that Java is pass-by-value. We will verify that in this blog under the section Pass-by-value for Object data types. Before jumping straight to the conclusion, let's understand in detail how different variables work in java.

Common mistake done by Java developers

There is one most common mistake that java developers do. They try to update object value using "=" or "new" keyword.

Let's look at an example where we want to change the color of box and square a number.

// Wrong - this will not return the updated value to calling method

public void changeToPink(Box boxToChange){

boxToChange = new Box("Pink");

}

public void square(int value){

value   =  value*value;

}

Topics we will be discussing

What is pass-by-value?

Passing variable by value means the value of the variable is copied into another variable. This copies the data into new memory.

Hence modifying new variable only updates the copy. The original variable value is not changed.

We will look in detail with examples later in this blog.

What is pass by reference?

Passing variable by reference means actual object reference or pointer is passed.

This means modifying the new reference object will update the original object.

Pass-by-value in java for primitive data types

Primitive variables are not objects. So primitive data types are pass-by-value. Which means only value is passed to new variable.

Lets look at the example for better understanding

objects references in stack for pass by value

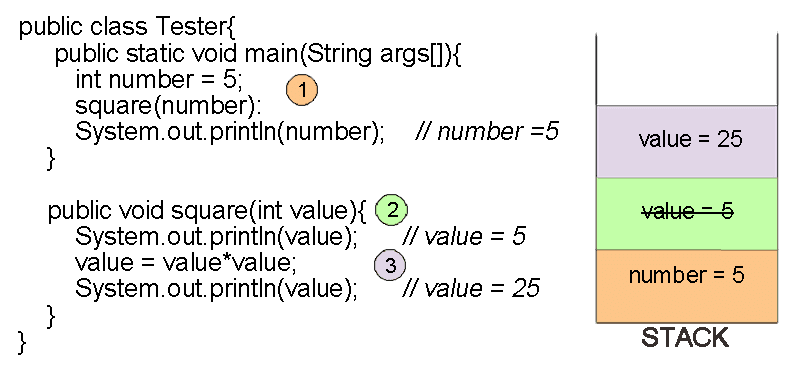
In the above code we can see that the value of number variable is 5. Then we call the square function.

Even after calling the square function value of number variable is 5 and does not change. Because, we just updated the local(new) variable in square function. This local variable is created in the scope of the function and hence the original number variable is not updated.

How to update primitive parameter from function call?

The only way to update the original primitive variable is by returning value from the function.

Following code will update the value of number variable after calling the function.

public class Tester{
  public static void main(String args[]){
    int number = 5;         // number =5
    number = square(number):
    System.out.println(number); // number = 25
  }

  public int square(int value){
    value = value*value;    // value= 25
    return value;
  }
}

How objects are updated?

If we update the properties of object using any reference variable, values of all reference variables are updated.
In other words if you update the object not the reference variable then original object is updated.

Example if we use following code to update the color of object userBox

public class Box{ 
  String color;
    Box(String color){
    this.color = color;
  }
}

public class Tester{
  public static void main(String args[]){
    Box userBox = new Box("Purple");
    changeToPink(userBox);
    System.out.println(userBox);   // Pink 
  } 
  public static void changeToPink(Box boxToChange){
    System.out.println(boxToChange);    // Purple 
    boxToChange.color="Pink"; 
    System.out.println(boxToChange);     // Pink
  }	
}
Block diagram for object reference

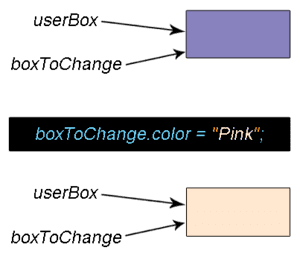
Using above method the object userBox in main method is also updated to pink color.

Pass-by-value in java for Object data types

In java even objects are pass by value. In fact it is passing reference as value. Even if it sounds confusing don't worry, we can explain it.

In java every object has reference variables. So when we pass object to another function the reference variable is passed. So the references to the actual object is copied.
Now two different reference variables point to the same object. Point to be noted here is that we have two different reference variables.

public class Box{ 
  String color;
  Box(String color){
    this.color = color;
  }
}

public class Tester{ 
  public static void main(String args[]){ 
    Box userBox = new Box("Purple");
    changeToPink(userBox);
    System.out.println(userBox);   // Purple
  }

  public void changeToPink(Box boxToChange){
    System.out.println(boxToChange); // Purple
    boxToChange = new Box("Pink"); 
    System.out.println(boxToChange); // Pink
  }
}
New object workflow

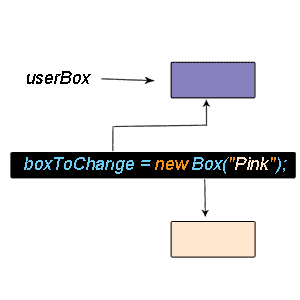
In the above code we have object userBox with color "purple". Now call the function changeToPink(). Even after calling the function changeToPink(), color of the user box remains "Purple".

When you use new keyword new object is created. The new box with pink color is stored in local/new variable(boxToChange). Original object userbox remains with old color purple.

Conclusion

As we can see that the updated reference variable does not update the original object. So we can say when we call the function new reference to same objecect is created, so only reference address is passed as value .

Fast track reading

Related topics

"This" keyword in java is one of the most used and very important keywords.
"This" keyword in java is used to refer current class objects.
We can use this keyword to access current class object members.

Image of boy for understanding this keyword in java

So you might be wondering if we can access the current class member directly, Why do we need this keyword?

One of the answer is that, if we have same name for method level and class level variable, then there is an ambiguity for JVM. JVM can not use class variable and uses the local variable by default. In such a case we can use "this" keyword for referring the class level variable.

6 uses of "this" keyword in java

  1. Accessing class level variable
  2. Accessing class methods - default
  3. For calling other constructor of same class
  4. Using 'this' keyword as return value
  5. Passing 'this' keyword as argument to method
  6. Passing this keyword as argument to constructor

1. Accessing class level variable

Assessing class level variable using this keyword is the most common use of "this" keyword.

Syntax: this.variableName

Most of the time we create some variable in class, then we can set the value from constructor or setter method. If we use same name for argument variable and class level variable then jvm will use local variable always, and it will not set the value to class level variable

lets take a look at example for better understanding,

public class Country{
private String name;
public Country(String name){
Wrong: name = name;
Right: this.name = name;
}
}

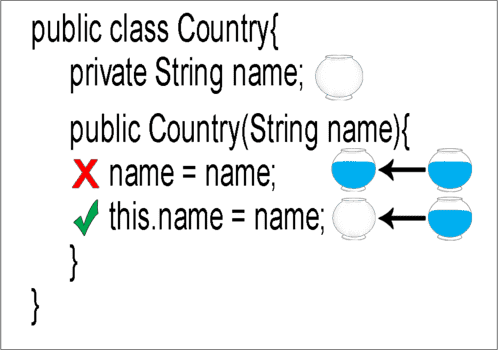
As shown in the above example if we just use name =name, value from argument will not be assigned to the class level variable. So the class level variable will always be null. This is because we set value to same variable not the class level variable.

The correct solution is to use this.name = name;

2. Accessing class methods using "this" keyword

For calling the same class method we can use this keyword.

However using this keyword for calling same class method is optional. Because even if you don't use this keyword, jvm always calls the method from same class by default.

Syntax: this.methodName(arguments);

Following examples shows two cases of calling class method with and without this keyword. In both cases the same method is called.

public class Dog{
	public void testMethod(String[] args){
		printString();
		this.printString();
	}	
	public void printString(){
		System.out.println("Success);
	}
}

Output:

Success
Success

3. For calling other constructor of same class

"This" keyword in java can be used to call other constructor of same class.

Some times we have different constructors with different parameters then you can reuse existing constructor using "this" keyword.
We can call any type of constructor within any constructor. That is we can call default in parameterized, parameterized in defatul or parameterized in parameterized constructor.

Syntax: this() or this(args)

The most important thing to note is that the use of "this" for calling other constructor should be the first line in constructor.

Let's assume we have a class, let's call it SomeClass. In this class we have a default constructor and a constructor with variable.
There is some default code that is required for at object creation. So we have added this code in default constructor.
Now we need the same code from default constructor in parameterized constructor. So in this case we can call default constructor from another constructor using this();

public class SomeClass{
	private int variable ;

	public SomeClass(){
		// some code...
	}
	public SomeClass(int variable ){
		this()
		this.variable = variable ;
	}
}

Lets take look at real life examples for shape class. In this class we have length and breadth variables. we need two constructors.
Fist constructor will take two arguments for length and breadth.
Second constructor will take only one argument, this will be same value for length and breath.

public class Shape{
	private int length ;
	private int breadth;

	public Shape(int length ,int breadth){
		this.length = length ;
		this.breadth = breadth;
	}

	public Shape(int length ){
		this(length,length);
	}
}

In above examples we are reusing constructors using "this" keyword in java.

4. Using "this" keyword as return value in java

If you need to return current object instance we can use "this" keyword.
Builder design pattern is one of the most common example of this case.

Let's look at an example for better understanding,

public class MenuBuilder{
	List<Menu> menus = new ArrayList<>();

	public MenuBuilder withAdd(){
		menus.add(new Menus("Add"))
		 return this;
	}
}

As you can see in the above example, we used "this" as return value in withAdd() Method. In above example withAdd() method returns the current class object.

5. Passing "this" keyword as argument to method

If we want to call some method and the method needs current class object as argument, we can use this keyword to pass the current class object instance.

We can pass this as argument to current class as well as another class methods.

public class City{
	private String name;
	private Country country;
	
	public City(String name){
		this.name= name;		
	}
	public void setCountry(Country country){
		this.country = country;		
	}
}
public class Country{
	private City capital;
	
	public void setCapital(String cityName){
		City capital = new City(cityName);

	// passing country class object using this keyword
		capital.setCountry(this);
		this.capital = capital;		
	}
}

As shown in the above example, we have City and Country class. In City class setCountry() method needs object of Country class. So we have passed Country class instance using "this" keyword from Country class.

6. Passing "this" keyword as argument to constructor

Similar to passing as argument to another method we can also pass "this" keyword as argument to constructor of another class.

We can pass this as argument to constructor of current class as well as to constructor of another class.

public class City{
	private String name;
	private Country country;
	
	public City(String name, Country country){
		this.name= name;		
		this.country = country;		
	}
}
public class Country{
	private City capital;
	
	public void setCapital(String cityName){
	// passing country class object using this keyword
		City capital = new City(cityName,this);
		this.capital = capital;	
	}
}

As shown in the above example, we have City and Country class. In City class constructor needs object of Country class. So we have passed Country class instance using "this" keyword from Country class.

Fast track reading

  • This keyword in java is used to refer current class objects
  • Using this keyword we can access current class instance variable, methods, or constructor
  • We can pass this keyword as argument to another method or constructor
  • We can return current class instance using this keyword

Related topics

Super keyword in java is one of the most used and very important keyword.

In java super keyword refers immediate super(parent) class objects.

Image of father and son for understanding super keyword in java

In java super keyword is only used in case of Inheritance. Whenever we create instance of class, parent class instance is also created. The parent class instance can be accessed by ' super' keyword.

So you might be wondering, if we have inheritance then we can access the parent class member directly. So why do we need super keyword?

The answer is, if we have same member in derived(child) and parent class, then there is an ambiguity for JVM. JVM can not use parent class member so it uses the child class member by default. In such a case we can use super keyword for referring the parent object members.

3 use cases of super keyword in java

Accessing parent class

  1. Variables
  2. Methods
  3. Constructor

Accessing parent class variables

If we have variable with same name in parent and child class, then we need to use super keyword to access parent class variable.

Lets see an example for better understanding:

class Father {
    String hairColor = "Black";
}

class Son extends Father {
    String hairColor = "Blonde";

    public void printHairColor() {
        System.out.println("Parent hair color: " + super.hairColor);
        System.out.println("Child hair color: " + hairColor);
    }
}

public class Tester {
    
    public static void main(String[] args) {
        Son son = new Son();
        son.printHairColor();
    }
}

Output:

Parent hair color: Black
Child hair color: Blonde

In the above example we can see that we are having hairColor variable in Father and Son class. So in Son class we used super.hairColor to access variable from father class.

Accessing parent class methods

If we have any method with same name in parent and child class, then we need to use super keyword to access parent class method.

Lets see an example for better understanding:

class Father {
    String getHairColor(){
	return "Blonde";
    }
}

class Son extends Father {
    String getHairColor(){
	return "Blonde";
    }
    public void printHairColor() {
        System.out.println("Parent hair color: " + super.getHairColor());
        System.out.println("Child hair color: " + getHairColor());
    }
}
public class Tester {

    public static void main(String[] args) {
        Son son = new Son();
        son.printHairColor();
    }
}

Output:

Parent hair color: Black
Child hair color: Blonde

In the above example we can see that we are having getHairColor() method in Father and Son class. So in child class we have used super.getHairColor() to access method from father class.

Accessing parent class constructor

Super keyword can be used to call the parent class constructor. Using super we can call default or parameterized keyword.

In java every time we create an object of a class it calls the parent class constructor even if you don't specify. This is called as constructor chaining.

If we specify which constructor (default or parameterized) from parent class to call, it will call the specified constructor of parent class. If you don't specify which constructor to call, it always calls the default constructor of parent class. And if parent class does not have default constructor, then JDK throws compile time error.

We can call the parent class default constructor using super() similarly parameterized constructor using super(arg1, arg2...).

It is important that the super() should be the first line in the child class constructor.

Lets see an example for better understanding:

class Father {
    String hairColor = "Black";
	
    public Father(String hairColor) {
        this.hairColor = hairColor;
    }
    public void printHairColor() {
        System.out.println("Hair color is : " + hairColor);
    }
}
class Son extends Father {

    public Son() {
        super("Blonde");
    }
}

public class Tester {

    public static void main(String[] args) {
        Son son = new Son();
        son.printHairColor();
    }
}

Output:

Hair color is : Blonde

In the above example we can see that we are having public Father(String hairColor) in parent class. So in child Son class we used super("Blonde") to access parent class constructor.

Fast track reading

  • In java super keyword refers immediate parent class objects
  • In java super keyword is only used in case of Inheritance
  • Super keyword in java accesses parent class variables, methods or constructor
  • Super call for the parent class constructor should be the first line in the child class constructor
  • If you don't specify super() in child class, JVM will provide it implicitly

References