This docker startup tutorial is designed for everyone who is interested to learn docker in a easy way. Main goal behind this tutorial is to make docker learning simple. As docker has simplified many things for software development, hence it is very important for everyone to know how to use docker in software development.

In this blog we will cover everything you need to get started with docker and skip some technical or theoretical details which are optional to understand in this phase. However, links will be provided where you can read if you are interested to know more.

Introduction

Sometimes setting up the environment for application could be very time consuming and difficult. Everything required to run application has to be setup properly like database, environment variables, required libraries etc. Just imagine how cool it would be if this can be done with single click? Yes, that we can achieve using docker😊.

What is docker?

Docker allows to package the application with required files and environment, share and run the application.

Docker is an opensource project for automation of most stages of the software lifecycle. For eg., packaging, sharing and deploying the application with required settings.

We can combine everything into a package then we can share or run it directly.

Docker structure for container and application

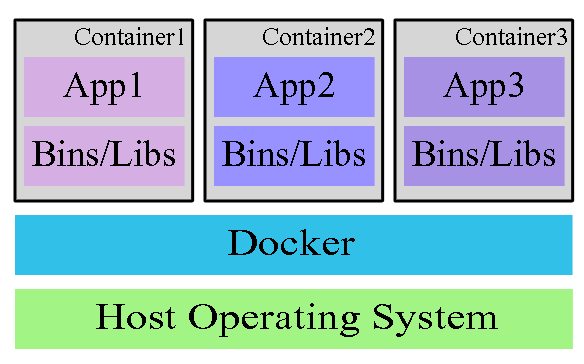
Docker runs an application in an isolated environments. Every running instance is called as container. Docker is designed to run any application with minimal operating system. Making it faster and efficient to run. We can include required library files and exclude extra things like unnecessary applications and files.

For Docker installation, You can follow these official pages to install Docker according to your preferred operating system. https://docs.docker.com/get-docker or https://docs.docker.com/get-started/#download-and-install-docker

Once docker is installed, please run docker version command to verify the setup and check docker version.

Most important terms in docker that everyone must know

Before going further you need to know few most important terminologies, which you will need almost every time you are working with docker.

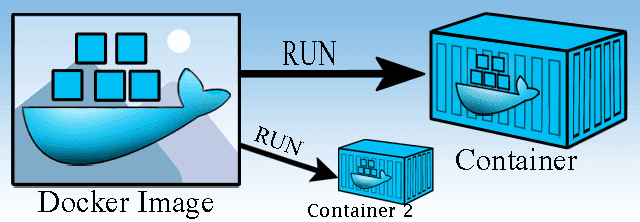
What is Docker Image?

Docker image is the read-only and ready to execute binary package of application.

Docker image contains everything needed to run an application including all dependencies, configurations, scripts, libraries, etc. You can run it directly without any other setup or configuration.

To run application in docker you need to have a docker image.

We can say it is like java jar or war file.

Docker Hub

Docker hub is a repository for images. From there you can download opensource, public, community application images.

You don’t have to always create docker image, you can download available images from docker hub and use in your applications.

Free public space is also available for storing or sharing customized images. https://www.docker.com/products/docker-hub

If you know maven you can compare it to be like maven repository.

Docker Containers

Docker containers are the running instances of docker images. So when you run any docker image, new container is created. We can create multiple instances from same image.

We can compare it like a java runtime object from class file or application context.

Every container runs in an isolated environment like virtual machine.

Containers are the lightweight and better alternatives to the virtual machine, as they use the memory as per requirement and do not need complete virtual operating system.

Docker image to container to explain difference
Docker image vs Container

8 Most important docker commands for beginner

These are the most important commands that everyone must know. If you try to run all these commands and see the output, then it will be easier to understand them.

  1. Docker ps: List container details
  2. Docker run: Creates new container from image
  3. Docker exec: Execute new command into running container
  4. Docker images: List all downloaded images
  5. Docker stop: stops one or more running container with 10 seconds of default waiting time
  6. Docker kill: stops one or more running container forcefully
  7. Docker rm: delete one or more container
  8. Docker rmi: delete one or more downloaded image

1. Docker ps

Docker ps command is used to list containers' details. By default it lists all running containers. We can use different options to control the list.

Syntax: docker ps [OPTIONS]

For example

List all running containers: Docker ps

List all running and stopped containers: Docker ps --all

Docker ps : List all running containers
Docker ps --all : List all running and stopped containers

For more details and options for the commands visit docker docs

2. Docker run

Docker run is the most used and most powerful command. This command is used to create new docker container from docker image.

Syntax: docker run [OPTIONS] IMAGE [COMMAND] [ARG…]

This command comes with wide range of options like network setting, environment variables, port etc

Also it is possible to provide specific commands or arguments to run in container.

For example

Run ubuntu container and print current directory path

docker run ubuntu pwd

Note: --rm is optional and it is used to remove container after it is stopped

docker run --rm ubuntu pwd

Run ubuntu container and keep it connected

Docker run --rm -it ubuntu

Type exit to close the connection

3. Docker exec

The docker exec command is used to run a new command in already running container.

Syntax: docker exec [OPTIONS] CONTAINER_ID/NAME COMMAND [ARG…]

For example

We need to run this example in 2 steps, First we need to create an running container with some name like myContainer

docker run --rm -it --name myContainer ubuntu

Open and run into another shell/cmd prompt, to list files or to connect the container

docker exec myContainer ls
docker exec –it myContainer bash

4. Docker images

This command is used to list downloaded images, sometimes it is useful see all downloaded images.

Docker images

5. Docker stop

Docker stop command is used to stop one or more running container with 10 seconds of default waiting time.

syntax: docker stop container1 [containers . . ]

for example

This example we will run in 2 steps,

First let's create some running containers using following command in different command prompts,

docker run --rm -it --name myContainer1 ubuntu
docker run --rm -it --name myContainer2 ubuntu

Now open another Command prompt and check running containers then stop it.

Docker ps
docker stop myContainer1 myContainer2

6. Docker kill

Docker kill command is used to stop one or more running container forcefully.

Syntax: docker kill container1 [containers ...]

To kill all running containers in linux or windows powershell

docker kill $(docker ps -q)

To kill all running containers using windowd cmd prompt

for /F %cin ('docker ps -q') do docker kill %c

7. Docker rm

Docker rm command deletes one or more container.

Syntax: docker rm [OPTIONS] CONTAINER [CONTAINER…]

Note: to remove running container force (–f) option is required.

Example

docker rm -f myContainer1 myContainer2

Delete all stopped containers using linux bash or windows powershell

docker rm $(docker ps -a -q)

Remove all stopped containers using windowd cmd prompt

for /F %c in ('docker ps -q') do docker rm %c

8. Docker rmi

Docker rmi command is used to delete one or more downloaded images. This command helps to free up memory by deleting not required images.

Syntax: docker rmi [OPTIONS] IMAGE [IMAGE…]

example

docker rmi ubuntu

Remove all images in linux or windows powershell

docker rmi $(docker images -a -q)

Remove all images using windowd cmd prompt

for /F %c in ('docker images -aq') do docker rmi %c

Fast track reading

  • Docker packages application with required files and setting then share and run directly
  • Docker image is the read-only and ready to execute binary package of application which includes all dependencies, configurations, scripts, library, etc
  • From Docker hub we can download open source, public, community application images
  • Docker containers are the running instance of docker images
  • Multiple instances can be created from same image

Writing unit test is very important for better software quality. For unit tests Mockito is one of the most common choices of developers. Mockito providers different way to mock methods, like do...when and when..then. Most of the time we face the question to use when-then vs do-when. We will see all the differences in detail.

In Mockito we can mock methods in 2 different ways,

DatabaseService service = Mockito.mock(DatabaseService.class);
when(service.isConnected()).thenReturn(true);
doReturn(true).when(service.isConnected())

Different methods for do-when

  • doNothing()
  • doReturn(Object toBeReturned)
  • doReturn(Object toBeReturned, Object… toBeReturnedNext)
  • doAnswer(Answer answer)
  • doCallRealMethod()
  • doThrow(Throwa=le… ToBeThrown)
  • doThrow(Class toBeThrown)
  • doThrow(Class toBeThrown, Class… toBeThrownNext)

Different methods for when-then

  • thenReturn(T var1)
  • thenReturn(T var1, T… var2)
  • thenAnswer(Answer var1)
  • then(Answer var1)
  • thenCallRealMethod()
  • thenThrow(Throwable… var1)
  • thenThrow(Class var1)
  • thenThrow(Class var1, Class… var2)

Recommended difference between thenReturn and thenAnswer in mockito

In most cases when-then is used because it provides more readability, however there are some cases, where both approaches behave differently and should be used carefully.

  1. Return type validation in mocking
  2. Mocking methods of spy objects
  3. Mocking void methods

Return type validation for mocked object

Return type of doReturn(..) is Object whereas the return type of thenReturn(..) is as per the method type. So in case of doReturn we might get org.mockito.exceptions.misusing.WrongTypeOfReturnValue exception if incompatible return value is used. In case of thenReturn, if we use wrong value the application won't compile.

List<String> mockedList = Mockito.mock(ArrayList.class);
Mockito.when(mockedList.size()).thenReturn("test");

This will give compile time error, hence easy to fix.

List<String> mockedList = Mockito.mock(ArrayList.class);
doReturn("Test").when(mockedList).size();

This will compile but fail at runtime.

For mocked objects it is best practice to use when-then option as it provides return type checking and it is more readability. However it has drawbacks in case of spied objects and void methods.

Mocking methods of spy object

Spy objects are linked to the actual objects, where we dont have to mock all the methods. And actual method calls are made for the methods that are not mocked.
For mocked object all the methods are mocked, and there we dont need real objects.

Mockito mocking method with when-then approach

When we are using mock, first we need to create mocked object. Then we specify what should be returned using when-then. In that case it don’t do anything with real class.

List<string> mockedList = Mockito.mock(List.class);

Mockito.when(mockedList.get(0)).thenReturn("Test");

assertEquals("Test", mockedList.get(0));

When we are using spy, as it is linked to real object, when we use when(spyobject.method()).thenReturn(value), the real method on spied object is called. Even when we try to mock the behavior.

Spy mocking method using when-then approach

If we mock method on spied object using when-then, real method is called but mocked value is returned. This could cause exception as some fields might be null.

List<string> spiedList = Mockito.spy(List.class);

Mockito.when(mockedList.get(0)).thenReturn("Test");

Real method get(0)is called on list and this throws java.lang.IndexOutOfBoundsException: Index: 0, Size: 0

The correct way to fix this issue is to use doReturn-when

List<String> spiedList = Mockito.spy(ArrayList.class);
Mockito.doReturn("Test").when(spiedList).get(0);
assertEquals("Test", spiedList.get(0));

Note: Real method is called only for spy class objects not for spy Interfaces.

Following code works fine as we are using Interface for spy not the object.

List<String> spiedList = Mockito.spy(List.class);
Mockito.when(spiedList.get(0)).thenReturn("Test");

Mocking void method

Mocking void method is different than other methods. For mocking void method, there is no when-then option. We have to use do-when option.

Example of mocking

List<String> mockedList = Mockito.mock(List.class);
Mockito.doNothing().when(mockedList).clear();

Example of Spy

List<String> spiedList = Mockito.spy(ArrayList.class);
spiedList.add("Test"); 
Mockito.doNothing().when(spiedList).clear(); 
spiedList.clear(); 
assertEquals("Test", spiedList.get(0));

Fast track reading

  • In Mockito method are mocked using 'when-then' or 'do-when'
  • In most cases when-then is used because it provides more readability with return type validation
  • Mocking methods of spy object using 'when-then' option could lead to exception hence 'do-when' option must be used
  • For mocking void methods there is no 'when-then' option
  • Real method of spy object is called if when-then option is used for mocking the method, however the mocked value is returned

Reference

Related Topics:

In the previous post we saw baiscs about java 9 modules like, what is module, how to create module project, module descriptor file and so on. In this blog we will learn how to compile and run java9 module program.

Recommended read: Java 9 module details: part 1

Table of content

Java9 Module example for hello world

Before going further let's take an example of hello world module,

Let's dive deeper with an example, for better understanding we will create two modules. We will put the modules under the folder 'project'.

First module, we will create is 'com.module.util' module. In this module we will create module-info.java and Greeting.java files.
Second module will be 'com.module.app' module. In this module we will create module-info.java and Main.java files.

Let's create two folders for modules as 'com.module.util' and 'com.module.app' in the 'project' folder. These modules contain files Greeting.java and Main.java respectively. Both modules will have module-info.java at top level as shown below.

D:.
├───project
│   ├───com.module.app
│   │   │   module-info.java
│   │   └───com
│   │       └───module
│   │           └───app
│   │                  Main.java
│   │
│   └───com.module.util
│       │   module-info.java
│       └───com
│           └───module
│               └───util
│                      Greeting.java

Note: com.module.util and com.module.app are the folder names

Code for the 'Greeting.java' in 'com.module.util' module is as below,

module com.module.util{

exports com.module.util;

}

package com.module.util;

public class Greeting{

public static String getMessage(){

return "Have a nice day";

}

public static void main(String[] args){

System.out.println("Greeting class is working");

}

}

Code for the 'Main.java' in 'com.module.app' module is as below,

module com.module.app{

requires com.module.util;

}

package com.module.app;

import com.module.util;

public class Main{

public static void main(String[] args){

System.out.println(Greeting.getMessage());

}

}

How to compile and run module java program

Now we will see how to run and compile module program. Even if some of the commands look complex don't worry, once you understand they will be easy and simple.

How to compile and run java program without modules

Before looking into how to run java modular program, let's understand how to run java package program without using module-info.java file.

To separate out our source files and class files we will use '–d' option to set the destination directory for class files.

Let's assume we want to run the above Greeting class which is present in the package 'com.module.util'. And we will put the .class files under the 'libs' directory.

D:\project>javac -d libs com.module.util\com\module\util\Greeting.java

Once we execute the above command, we can see that the .class file is created under libs\com\module\util\Greeting.class

Now if we would like to run the main class created by above command, we have to specify path where jvm can find class files. Since our classes are present under libs folder we can specify path using –cp or -classpath.

D:\project>java -cp libs com.module.util.Greeting

OUTPUT

Greeting class is working

Compile and run java 9 module program

Now we have seen how to run java package program and put the classes into separate folder, to avoid mixing .java and .class files. We will use -d option for modular program as well.

Most important thing to remember is that, while compiling module, we have to compile .java source files and module descriptor file(module-info.java) .

In windows path are separated by semi-colon(;) and in Linux and mac using colons(:)

Most important new argument options

There are few new parameters/argument types introduced in java 9 for running the modular program that we must know.

  1. module-path: Module-path option is used to specify where the modules are located. It is used at compile and run time.
    • At compile time it is used with javac option to specify path where the dependent modules can be found.
      Syntax : javac --module-path path1;path2
    • At runtime it is used to specify dependent module and module which is to run
      Syntax : java -module-path pathslist
      Note: we can use -p path as shortcut for --module-path path.
  2. module: The --module argument is used to compile list of modules or run a module.
    • Syntax : javac –module path1;path2
    • Syntax : java –module module/class
      Note: we can use -m as shortcut for –module.
  3. module-source-path: the argument --module-source-path us used to specify the root directory where the source files or packages are placed.
    Sometimes the projects are organized in such a way that the code is placed in special folder.
    For example src/main/java

Note: when we are using –module or –m option it is mandatory to use –module-source-path option, even if the source files are in same folder. 
  - - module-path == >  -p 
 - - module       == >  -m 

Example
D:\project> javac -d libs --module-source-path ./ --module com.module.app 
D:\project> java --module-path libs --module com.module.app/com.module.app.Main 

OUTPUT

Have a nice day

Different ways to compile and run java modules

1) We can specify all the files separated by space in javac command:

Warning: If you are using this option don’t compile multiple modules in same folder. Otherwise it will override module-info.class files

Syntax to compile:
javac –d outputDir --module-path requiredModulesPath moduleDir\module-info.java moduleDir\package\File1.java moduleDir\package1\package2\File2.java
Syntax to run:
java --module-path paths --module module/package.MainClass

Note: even in windows in java '/' is used as separator for module and class

Example to compile com.module.util module

D:\project> javac -d libs com.module.util\com\module\util\Greeting.java com.module.util\module-info.java

After this command we should see module-info.class and Greeting.class files are created

project
├───libs
│   │   module-info.class 
│   └───com 
│       └───module 
│           └───util 
│                  Greeting.class 

Now we can run and check our module using following command

D:\project> java --module-path libs --module com.module.util/com.module.util.Greeting

Greeting class is working

Now lets run the Main class from app module which is dependent on util module which is compiled in libs path.

D:\project> javac --module-path libs -d app com.module.app\com\module\app\Main.java com.module.app\module-info.java

D:\project>java --module-path app;libs --module com.module.app/com.module.app.Main

Have a nice day

2) We can specify module names instead of java files:

This is recommended option to compile the applications. If we use this option, we can compile multiple modules in single directory as separate folder for each module with module name is created.

Also if required modules are in the same folder, they are automatically compiled even if they are not specified

Syntax to compile:
javac –d outputDir --module-path requiredModulesPath --module-source-path rootOfSOurceFiles --module modulesToBeCompiles

Example

D:\project>javac -d libs --module-source-path ./ --module com.module.util,com.module.app

After executing above command, following classes are created

project 
├───libs 
│   ├───com.module.app 
│   │   │   module-info.class 
│   │   └───com 
│   │       └───module 
│   │           └───app 
│   │                   Main.class 
│   └───com.module.util 
│       │   module-info.class 
│       └───com 
│           └───module 
│               └───util 
│                       Greeting.class 
Syntax to run:
java --module-path requiredModulesPath --module module/package.MainClass

Example

D:\project>java --module-path libs --module com.module.app/com.module.app.Main

Have a nice day

Common mistakes in running modules

Let's assume we would like to run Main class from com.module.app module.
Com.module.app module is dependent on com.module.util module.
Com.module.util module is compiled in libs folder
Com.module.app module is compiled in app folder.

When required modules is not specified in module path

java --module-path app -m com.module.app/com.module.app.Main

Error java.lang.module.FindException: Module com.module.util not found, required by com.module.app

When module path of the module which is to be run is not specified in module path

java --module-path libs-m com.module.app/com.module.app.Main

Error: java.lang.module.FindException Module com.module.app not found

When we use the wrong slash(\) to run –correct way is module/class

java --module-path libs;app -m com.module.app\com.module.app.Main

Fast track reading

  • module-path: used to specify where the modules are located
  • module: used to specify modules list for compile or module to run
  • module-source-path: used to specify the root directroy where the source files or packages are places
  • If we use –-module or –m option it is mandatory to use –-module-source-path option
  • short codes -p can be used for –-module-path and -m for --module
  • Syntax to compile javac –d outputDir -p requiredModulesPath --module-source-path rootOfSOurceFiles -m modulesToBeCompiles
  • Run syntax: java -p requiredModulesPath -m module/package.MainClass

Frequently asked question FAQ:

What is Module resolution process?

When we run the module program, at start jvm checks for all required modules. This process of finding all modules at start is call as Module resolution process.
We can print modules scanning process log by using command –-show-module-resolution in the run command.
Note: in module resolution process first main module is searched then it keep adding required module in tree form.

What are the java restricted keyword or contextual keyword?

Newly added 10 keywords, which are considered as keyword only in case of Module descriptor file(module-info.java), are called as restricted keywords.
This keywords are open, module, requires, transitive, exports, opens, to, uses, provides, and with.
For backward compatibility in every other cases it is considered as identifiers. Unlike other keywords we can use this keywords is variables or method name.

What is module descriptor file?

From java 9, special file with name module-info.java is requied in root folder of module, which specifies the metadata of module, this file is called as module desciptor file.

Can we export multiple package in one line?

No, To export multiple packages separate exports keyword is required.

Can we add multiple modules dependancy using single requries keyword?

No for separate module new requires keyword is required.

Related topics

In this blog we will go through one of the most important features of java 9, which is 'Modules' aka 'Java Platform Module System (JPMS)'. We will understand everything about JPMS like, what is module? How it helps to add modules? and How to create and use module? Even if you don’t know anything about module don’t worry we got it covered.

If you are scared of this new word('Modules'), don’t worry once you understand it, it will be very easy.

Difference between JDK8 and JDK9

We all know that JRE is the most important part of JDK. But, since java 9, JDK does not contain the JRE folder 😮. Yes! that is true, because from java 9 JRE is converted to multiple small modules and they are present in folder called 'jmods'.

We can list system modules or the contents of this 'jmods' folder by using the command : java --list-modules.

Table of contents

What is a Java 9 Module?

Module system is a part of Jigsaw Project. It adds one more abstraction level above packages. In other words, it is a 'package of Packages' that makes our code even more reusable.
It is also fine to say that a module is a group of closely related packages, resources and module descriptor(module-info.java) file.

In Java 9 'java.base' is a base module. It does not depend on any other modules. By default, all modules including user defined modules are dependent on this module.

Even if we do not specify 'java.base' module, it will be imported automatically.

Features of java 9 Modules

  • Increases code reusability: by creating modules we can use them in different projects
  • Easy and meaningful grouping of packages: if we have many packages in one project it is difficult to manage and organize code, this is where modules come to the rescue
  • More abstraction to packages:we can decide which packages are allowed to be accessed outside and which are private or for internal use
  • Separation of resource: each module will have it's own required resource files like media or configuration files
  • Internal or secure classes can be hidden from outside world
java 9 module project structure

Steps to create Module

  1. Create a folder with module name. Generally company name in reverse with artifact name is used. eg: 'com.stacktraceguru.util'
  2. Add file with name 'module-info.java' in module root folder. This file is called as 'Module Descriptor' file
  3. Create java packages as per requirement
  4. Add classes as required under the created packages

What are the rules for creating Module?

  • Module name must be unique
  • Each module must have exactly one Module Descriptor file with name 'module-info.java'
  • Package names must be unique. Even in the different modules we cannot have same package names
  • We can add media and other resource files in the module
  • Each module will create one jar file. For multiple jars we need to create separate modules
  • One project can have multiple modules

Note: Module name should not end with digits

What are theModule types?

Depending on how the modules are used, they are categorised into 4 types,

  • System Modules: the modules from JDK and JRE. Can be listed using java ´--list-modules
  • Application Modules: all the modules created in an application to achieve a functionality
  • Automatic Modules: existing jar files which are not modules but are added to module path. When we add non module jars to module path, module with jar name is created.
    • By default exports all the packages
    • By default can access classes from all other modules
  • Unnamed Module: jars and classes added into the classpath. When we add jar or class to the classpath all these classes are added to the unnamed module
    • Only exports to other unnamed module and automatic module. This means, application modules cannot access these classes
    • It can access classes from all the modules

What is Module Descriptor file?

It is a file with name module-info.java, under the root module path. This file contains the module metadata information.

This is also java file which is compileable using javac command.

This file defines following things

  • Public packages: list of packages that current module exports using 'exports' keyword
  • Dependencies on other modules: list of other modules on which the current module is dependent on. This is done using 'requires' keyword 
  • Services offered: list of services that current module provides using 'provides' keyword
  • Services consumed: list of services that current module consumes using 'uses' keyword
  • Reflection permission: permission to specify if refection can be used to access private members using 'open' keyword

Note: Module descriptor file needs to export packages as by default all packages are private. Also, we can not use reflection on other module classes. We need to enable reflection in order to use reflection.

module com.module.util{ // module <module.name>
 exports com.module.util;
 requires java.sql;
 }

Exports

By default all the packages are private and we can make them public using exports keyword

Syntax

exports <packageToExport>;

Example

module com.module.util{
    exports com.module.package1;
    exports com.module.package2;
}

Rules to use export keyword:

  • only exports packages not classes
  • each package requires new exports keyword

Qualified export: Exports … To

This exports packages to only specific modules and not to all. It is also known as qualified export.

Syntax

exports <packageToExport> to <comma-separated module to grant access>;

Example

module com.module.util{
    exports com.module.package1;
    exports com.module.package2 to com.module.app;
    exports com.module.package3 to com.module.app, com.module.help;
}

In above case all modules can access com.module.package1, But only com.module.app can access com.module.package2 as well.

Requires

If a module needs to access packages exported from other modules, then these other modules must be imported using 'requires' keyword.

Only after specifying the module dependency using 'requires', the other module packages can be used.

Syntax

requires <module-to-access>;

Example

module com.module.app{
    requires java.sql;
    requires com.module.util;
}

Rules to use requires keyword:

  • only module can be specified for 'requires'. Packages cannot be specified
  • dependency of each module must be specified separately, with separate 'requires' keyword

Requires Static

Sometimes we need some modules during compile time only and they are optional at runtime. For example, testing or code generation libraries.

If we need compile time dependency that is optional at runtime then this dependency must be specified using 'requires static' keyword.

Syntax

requires static <module-to-access>;

Example

module com.module.app{
    requires static java.sql;
    requires com.module.util;
}

In this example java.sql is mandatory at compile time but optional at runtime. 

Requires Transitive

There is a possibility to grant access of the modules, on which our current module depends, to the module that uses our current module. The 'requires transitive' keyword helps to achieve this.

This means all the modules that are using our module will get the access to transitive dependency automatically.

Syntax

requires transitive <module-to-access>;

Example

module com.module.app{
    requires transitive com.module.util;
    requires java.sql;
}

So all other modules that are using com.module.app module can access the exported packages from com.module.util.

Uses

Using uses keyword we can specify that our module needs or consumes some service. Service is a interface or abstract class. It should not be an implementation class. 

Syntax

uses <service-required>;

Example

module com.module.util{
    uses com.util.PersonDataService;
}

Note: The most important thing to note here is that 'requires' adds a module dependency, whereas 'uses' specifies required service class. 

Provides … With

We can specify that our module provides some services that other modules can use.

Syntax

provides <service-provided> with <service-implementation-class> ;

Example

module com.module.util{
  provides com.util.PersonDataService with com.util.DbPersonServiceImpl;
 }

Open

Since java 9 encapsulation and security is improved for the reflection apis. Using reflection we were able to access even the private members of the objects.

From java 9 this is not open by default. We can although grant reflection permission to other modules explicitly.

open module com.module.util{
}

In this case all the packages from util module are accessible using reflection. 

Opens

If we do not want to open all the packages for reflection we can specify packages manually using 'opens' keyword.

module com.module.util{
    opens com.module.package1;
}

In this case only classes from package1 are accessible using reflection.

Opens … To

 Using 'opens ...to' keyword we can open reflection permission for specific packages to specific modules only.

module com.module.util{
  opens com.module.package1 to module.a, module.b, org.test.integration;
}

In this case only module.a, module.b, org.test.integration modules can access classes from package1 using reflection.

Note: If we need reflection access to the module, we can gain the access using command line option '–add-opens', even if we are not the owner of the module.

Aggregator Module

First of all, this is not a technical concept. It is just a convenience concept for developers to make there life easier.

Sometimes multiple modules require other multiple modules. Instead of adding these in every module descriptor, we can create one module that will add all the required dependency using 'transitive'. Then we just need to add dependency of this module wherever needed, this will add all the required modules transitive dependency. This common module is the 'Aggregator module'.

For example, we have 10 modules, modA to modJ. modP, modQ, modR needs all 10 modules, then we can create one common module as below,

module modulePQR{
  requires transitive modA;
  ....
  ...
  requires transitive modJ;
}

Then modules P, Q and R just need to add require for modulePQR

module modP{
  requires transitive modulePQR;
}

The module modulePQR is the Aggregator module.

Fast track reading

  • Java Platform Module System (JPMS) is a part of Jigsaw Project
  • From java 9, jre is converted to multiple small modules and they are present in folder 'jmods'
  • Module is a group of closely related packages, resources and module descriptor(module-info.java) file
  • Module names must be unique
  • Each module must have exactly one Module Descriptor file with name 'module-info.java'
  • Packages must be unique. Even in the different modules we cannot have same package
  • 4 Types of Modules: System Modules , Application Modules, Automatic Modules and Unnamed Module
  • Module descriptor file must specify requires modules, exported packages, Services offered, Services Consumed and Reflection permission
  • Exports : By default all the packages are private and we can make them public using exports Keyword
  • Requires : specify the module dependency
  • Only compile time dependency is specified using requires static
  • Requires Transitive: Means all the modules who are using our module will get the access to transitive dependency automatically,
  • Uses: specifies that our module needs or consumes some service
  • Provides … With: specifies that our module provides some services that other modules can use
  • Open reflection permission to other modules explicitly
  • Aggregator Module:- module which will add all the required dependencies using transitive