
Every programmer writes code every day. But, writing code is not enough. Writing good and reusable code is important. If you don't know how to write reusable code, don't worry this blog will help you. In this blog we will learn Bridge pattern. It is one of the design patterns which helps to write small and reusable methods. We will use java to implement one bridge design pattern example.
What is bridge design pattern?
Bridge design pattern is one of the Structural design patterns. As the name suggests, bridge design pattern is used to connect two pieces of code. Also, sometimes we need to separate the code so that it is reusable and easy to maintain. And these separate pieces then can be joined together when needed by bridge design pattern.
Whenever we have two pieces of code with small different behavior, we can use bridge design pattern.
The most important steps in implementing bridge design pattern is to break the code into two parts - Abstraction and Implementation
- Abstraction : It is the main functionality. It will contain the reference to the implementation. It refers to the core functionality.
- Implementations : It is the piece of code that performs dynamic behavior. Code which we can take out from core method and implement separately.
Bridge design pattern real life example
For understanding bridge design pattern we can take a real life example. It is very common now a days. Whenever we purchase any smartphone, we get a charger. The charger cable now-a-days can be separated, so we can use it to connect as USB cable to connect other devices.
 | 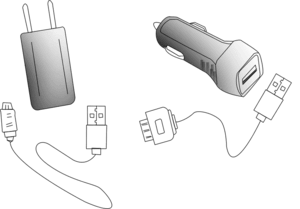 |
| As shown in image, we have 4 different chargers. 2 for house use and 2 for Car use. | If we implement bridge pattern then we just need 1 adapter each for house and for car use. |
Similarly, in case of software development there are so many cases, where we need separate things to make more reusable code. In such cases bridge design pattern is used to have communication between the components.
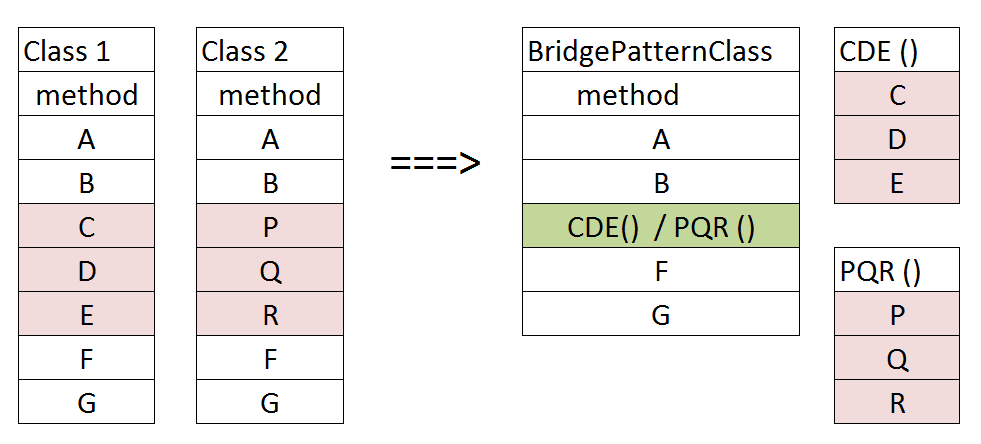
For instance, let's assume we have 2 classes Class1 and Class2. In these classes only some part of the code is different. You may want to reuse the same code. So the solution we can think of creating some function and use it. As shown in image.
Then the question arises how to write the class to use different method at run time. Do we need conditional statements? No there is another option. We can create another class and pass its object as argument. Then use this object to call the method. Depending on requirement we will pass different object. Even if this sounds complex, it is not. Let us simplify it a bit further.
Software example for bridge pattern
Almost in every application we need to store data. Let's assume we need to store in 2 different storage mechanisms file and database. Also, before we store, we have to process the object [validation, set some data etc.]. Normally we go with separate classes to do these processes as shown below:
checkAccess;
validateObject;
setAuditFields;
openFileToWrite;
writeDataInFile;
closeFile;
return studentId;
}checkAccess;
validateObject;
setAuditFields;
openDbConnection;
storeDataInDb;
closeConnection;
return studentId;
}We have code for storing Student object into file and database. This is a common scenario. Now let's assume, that we need to add code to do the same thing for course object also. Then we will need two more classes like SaveCourseInFile and SaveCourseInDB.
Also if we need to add new storage system like other database or network call, then we will have to create new class for each type. Like for our example Student class and Course class. This will keep increasing for each new class and storage type.
Bridge design pattern simplifies the above scenario by helping us write reusable code.
Steps to implement Bridge design pattern in java
As we know that we need to create two parts abstraction and implementations,
- We will create two interfaces for abstraction and an implementor.
- We are using interfaces as standard structure but depending on requirements, you can go with abstract or parent classes also
- Creating interface or parent class for abstraction is not mandatory. However, if you are planning to make it more dynamic it is better to create either an interface or parent class
- In the Abstraction we will need reference to implementor
- You can do it in many ways by parameterized constructor, or method arguments
- Abstraction will have function to perform main operation
- Implementor will have function to perform dynamic part of code
- We will create implementing classes for both
- In example we have created one for abstractor and two for implementor. You can create as many as you need. You could have two on both side or two for abstractor and one for implementor
UML diagram for Bridge design pattern
Let see bridge design pattern solution implementation.
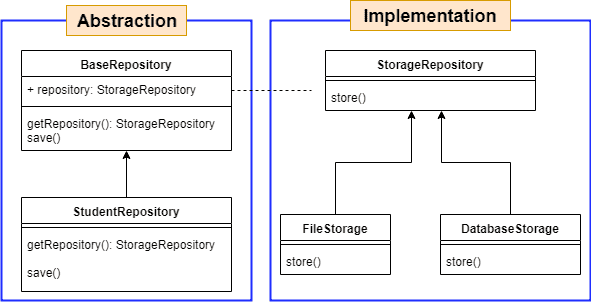
As shown in the image we will create separate code for storing in file and db. Then we use this in the core functions. This will solve the problem of adding new tables like course. After that we just need one class SaveCource. This class will use storage service to store into specific storage system.
Bridge design pattern implementation in java
We can implement design patterns in any language. Let's see how to implement above given example in java using bridge design pattern.
Firstly, let's create the model classes that we need. We will use one base class
private Long id;
public Long getId() {
return id;
}
public void setId(String id) {
this.id = id;
}
}private String name;
public String getName() {
return name; {
}
public void setName(String name) {
this.name = name;
}
}Now we will create interface for implementor as StorageRepository.java
interface StorageRepository{
    public void store(BaseEntiy entiy);
}
Now let's create two implementing classes for StorageRepository interface
public void store(BaseEntiy entiy){
try {
FileOutputStream fileOut = new FileOutputStream("filePath");
ObjectOutputStream objectOut = new ObjectOutputStream(fileOut);
objectOut.writeObject(entiy);
objectOut.close();
} catch (IOException e) {
e.printStackTrace();
}
}
}public void store(BaseEntiy entiy){
EntityTransaction tx = getEntityManager().getTransaction();
try {
tx.begin();
getEntityManager().persist(entiy);
tx.commit();
} catch (Exception ex) {
if (tx.isActive()) {
tx.rollback();
}
}
}
}We have everything we need for implementor. Now let's create abstraction class for core functionality. We will create class for BaseRepository interface. It is not mandatory to create interface, you can also create abstract class. It is also possible to implement bridge design pattern with out BaseRepository. You can directly create StudentRepository.java
interface BaseRepository{
    public void save(BaseEntiy entiy);
    public StorageRepository getRepository();
}
Now lets create implementing class for storage BaseRepository
class StudentRepository implements BaseRepository {

    private StorageRepository repository;
    public StudentRepository(StorageRepository repository){
        this.repository=repository;
    }
	public StorageRepository getRepository(){
		return repository;
	}

     public Student save(Student student) {

        if (student == null || student.getName() == null) {
            return null;
        }
        student.setId(getNextId());
        repository.store(student);
        return student;
    }
}
Now we can use student repository with appropriate StorageRepository to achieve the functionality. While creating object of StudentRepository we can specify FileRepository or DataBaseRepository.
 public static void main(String[] args){
	// code to store in file
     StudentRepository fileRepositroy = new StudentRepository (new FileRepository());
     fileRepositroy.save(new Student() );

     // code to store in DataBase
     StudentRepository dbRepositroy = new StudentRepository(new DataBaseRepository());
     dbRepositroy.save(new Student() );
 }
Common usage
There are so many usage where we can use the bridge design pattern.
- If any function is doing multiple things
- We can separate into two functions
- If class is doing multiple tasks
- We can make separate classes
- When we need code to be loosely coupled
- Code should be less dependent on each other
- Functionality or behavior can be changed dynamically
- Run time behavior can be changes by providing different implementer class
Benefits of bridge design pattern
- Increases code re-usability
- Reduces the duplicate code
- Increases code maintainability
- if we need to change something, change at one place only
- Increase the productivity as it saves both development and testing efforts
- No need to write or test common code again
- Respects Single Responsibility principle
- If something breaks then it does not break everything
Limitations of bridge design pattern
- The two processes must be separable
- The separated functions should be able to work independently
- This must be planned before development
- Failing common code can break multiple processes
- Changes in common function is difficult as this code can be used by multiple functions
Fast track reading
- Structural design pattern
- Used where we have dynamic behaving code
- Two most important parts – abstraction and implementation
- Implementations : it is the peace of code that perform dynamic behavior.
- Abstraction : It is the main functionality. It will contain the reference to the implementation.
- Increases code re-usability and usage Single Responsibility principle