Builder design pattern is one of the most important and simple design pattern in java.
We use it in real life also. For instance, consider assembling a car or making a burger. It is similar to making an object of a class in Object Oriented Programming for example navigation menu of any application.
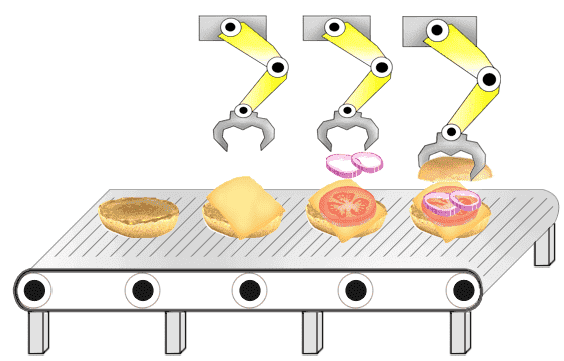
Let’s understand the builder pattern with our example for burger. So our friends Becky and Sam decide to go for a long drive. On their way they see a burger outlet and decide to stop for a snack. Becky orders for a classic cheese burger but Sam is on a diet and hence goes for a veggie variation of the burger 😛 . Also there are many different people present in the outlet who are ordering different types of burgers.
There they notice that burger making involves different processes, like toasting the bread, creating patty for burger, making sauces and then everything is put together.
In case of programming this is where the Builder pattern comes into picture.
Builder pattern can be defined as, a design pattern that separates the construction of a complex object from its representation.
What is construction and representation of an object?
Representation: This step consists of how our product looks at the end when it is ready. In this step we combine the already constructed parts.
For instance first there is a bread, then patty on top it followed by some veggies, then some sauces and at the end finished off with final layer of bread.
Construction: whereas, this step means how the parts of the products are actually made. This may include multiple steps.
For example baking a bread, making burger patty, making different sauces, cutting of vegetables etc.
Builder pattern separates these 2 steps so that we can create different type of products using the same set of steps. Thus, it provides flexible solution to object creation problems.
Where to use Builder pattern?
What to solve?
The Builder design pattern solves problems like:
How can a class (the same construction process) create different representations of a complex object?
How can a class that includes creating a complex object be simplified?
Creating and assembling the parts of a complex object directly within a class is inflexible. Let's say we have a class with parameterized constructor with some parameters. If we want to create an object of this class, we need to pass all the parameters of the constructor. If we need to create object with different set of parameters we can not do with same constructor.
This makes it impossible to change the representation of the object later without changing the class.
How to solve?
The Builder design pattern describes how to solve such problems:
A class delegates object creation to a Builder object instead of creating the objects directly.
Encapsulate creating and assembling the parts of a complex object in a separate Builder object.
A builder class can create different representations of a complex object.
As we can see in the figure below, the construction process of the burger. The same process can be used to create different types of burgers.
Thus we can see the application of the builder pattern in our day to day life. Now, let us learn how to programmatically apply this pattern to our code in the following sections.
How does Builder pattern work?
Let us divide the code in 3 parts to understand how this pattern works. Then we will see the significance of each part.
Product : This part of the code is the actual object that we are trying to build. For example, in our case it would be 'the burger'.
Builder : It will contain the general methods needed to build the product.
Executor : This is the important part which actually calls the builder methods to create the 'Product'. This in our case would be the 'Employee' who prepares the burger for us. He/She will invoke appropriate method from the 'BurgerBuilder'
Let us see in the following section how can we put this together in a code.
Implementation of Builder pattern
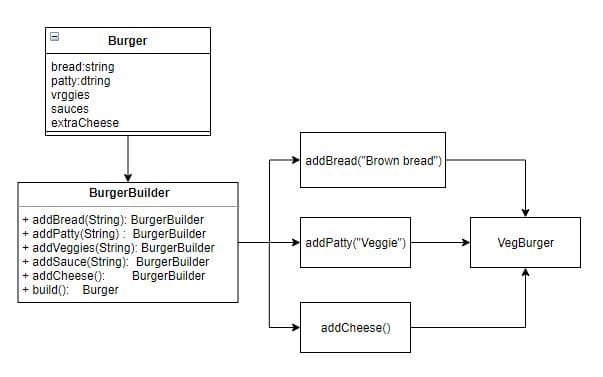
Let us now see the implementation of this pattern in Java. We will see each part one by one starting with the "Product", which in our case is the "Burger". This is just a normal entity of which we need to create different instances as per our requirement.
package main.java.creational.builder;
public class Burger {
	private String bread;
	private String patty;
	private String veggies;
	private String sauces;
	private Boolean withExtraCheese = Boolean.FALSE;

	public String getBread() { return bread; }
	public void setBread(String bread) { this.bread = bread; }
        <......... Getters and setters for these properties>

	@Override
	public String toString() {
	    return "Burger [bread=" + bread + ", patty=" + patty + ",
                       veggies=" + veggies + ", sauces=" + sauces + ",
                       withExtraCheese=" + withExtraCheese + "]";
	}
}
The next part of our pattern is the "Builder" itself. As the name suggests, this is the class contains the methods we need to build the product.
package main.java.creational.builder;
public class BurgerBuilder {
	private Burger burger;

	public BurgerBuilder () { this.burger = new Burger(); }
 	public void addBread(String bread) { burger.setBread(bread); }
 	public void addPatty(String patty ) { burger.setPatty(patty); }
 	public void addVeggies(String veggies ) { burger.setVeggies(veggies ); }
 	public void addSauce(String sauce) { burger.setSauces(sauce); }
 	public void addCheeze() { burger.setWithExtraCheese(Boolean.TRUE); }
 	public Burger build() { return this.burger; }
}
Now, we come to the last but important part of our code. This is called as the "Executor". Executor calls the builder methods to create the product. Thus we will have an "Employee" to create the veg burger of us in our example. Let us take a look at how our Employee looks like! 😛
package main.java.creational.builder;
public class Employee {
	public static void main(String[] args) {

		Burger vegBurger = new BurgerBuilder()
		.addBread("Brown Bread")
		.addPatty("Veggie")
		.addVeggies("Pickles")
		.addSauce("All")
		.addCheeze().build();
	}
}
Advantages
Allows you to vary a product’s internal representation.
Encapsulates code for construction and representation.
Provides control over steps of construction process.
Disadvantages
Data members of class aren't guaranteed to be initialized.
Dependency injection may be less supported.
Fast track reading
Builder design pattern is one of the structural design pattern
Separates the construction of a complex object from its representation
Every programmer comes across a scenario, when data needs to be represented as a tree structure.
While dealing with tree structure many times we need to treat different objects in similar ways, like file and directory. File and directory both having size, name, creation time etc. Another example can be of employee hierarchy in an organization. Manager, CEO and employees all are instances of a Person.
Composite design pattern can come very handy in these situations.
From the name, "Composite" means the combination or made from different parts. So this pattern provides solution to operate group of objects and single object in similar way.
The two most important uses of the composite design pattern are,
Objects can be represented in a tree structure hierarchy
Composite and individual objects are treated uniformly
There are many real life examples for composite design pattern.
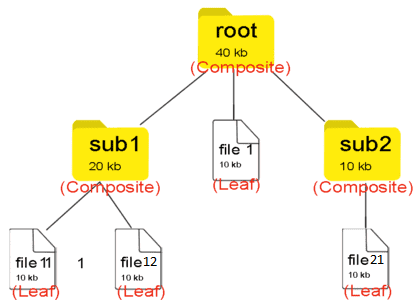
The most common example can be file-directory structure. As shown in image.
Node can be a directory or a file.
Even though they are different type of objects, many times we need to treat them similarly . For eg: we can check size of file as well as size of directory. The size of directory is sum of size of all the files in that directory.
Another example can be the employee hierarchy in an organization.
In the image lets say we have CEO as top node, then mangers and then employees.
CEO manages the mangers. And has group of employees.
All employees, managers and the CEO are instances of a person.
Composite design pattern structure
The image shows the basic structure of the composite design pattern.
There are 2 types of objects Composite object and Leaf object.
1) Composite Object : It is an object which contains other object. This has children e.g: Directory(file folder) 2) Leaf Object : It is a single object. It does not have children e.g: File
Where can we use composite pattern?
There are so many cases where we can use composite design pattern in any programing language. Some of them can be:
The data needs to be represented in hierarchy or tree structure
When we need parent-Child relationship
When parent and child objects need to be treated in same way
Steps to implement composite design Pattern?
We need to define leaf and composite objects as same data type
By implementing interface or extending class
Then write(implement) common method in all the leaf and composite objects
In Leaf node perform their own desired behavior
In Composite object write customized function or each child of this node can call this function
UML diagram for composite design pattern implementation
As shown in the image we will create interface for "File". Then we will have two different classes. One for Directory type and second for other than directory like .txt, .doc, etc The Directory class is composite class that can contain other files or directories.
Implementing Composite Design Pattern in Java
Let's implement the example for file directory structure. We will create child1.txt and child2.txt files . Then we will have root directories. Root directories will contain child1.txt and child2.txt files.
Then we will try to get size of child1.txt and root directory.
As explained in step 1 lets create parent type as File interface
interface File {
    public String getType();
    public Long getSize();
}
Now lets create classes for file and directory type
class TextFile implements File {
private Long size;
public TextFile(Long size) {
this.size = size;
}
public String getType() {
return "txt";
}
public Long getSize() {
return this.size;
}
}
class Directory implements File {
private List <File> files = new ArrayList<>();
public String getType() {
return "directory";
}
public void addFile(File file) {
files.add(file);
}
public Long getSize() {
Long size = 0L;
for (File file : files) {
size = size + file.getSize();
}
return size;
}
}
Now we have implemented two leaf and one composite object. Both objects are of same time 'File'.
We can use getSize() on TextFile class or Direcotry class.
Now let's test the code using main method.
class Application {

	public static void main(String[] args) {
		TextFile child1 = new TextFile(100L);
		TextFile child2 = new TextFile(200L);

		Directory root= new Directory(100L);
		root.addFile(child1);
		root.addFile(child2);

		System.out.println(child1.getSize());      // output : 100
		System.out.println(root.getSize());    // output : 300
	}
}
Benefits
Data can be represented as tree structure
Same operations can be performed on different type of objects
Reduces the overhead of handling different type of objects
Client process doesn't need to worry about node data type because all objects are represented by same parent type
Limitations
Objects should be compatible
If the objects behavior is different we can not use it
"This" keyword in java is one of the most used and very important keywords. "This" keyword in java is used to refer current class objects. We can use this keyword to access current class object members.
So you might be wondering if we can access the current class member directly, Why do we need this keyword?
One of the answer is that, if we have same name for method level and class level variable, then there is an ambiguity for JVM. JVM can not use class variable and uses the local variable by default. In such a case we can use "this" keyword for referring the class level variable.
6 uses of "this" keyword in java
Accessing class level variable
Accessing class methods - default
For calling other constructor of same class
Using 'this' keyword as return value
Passing 'this' keyword as argument to method
Passing this keyword as argument to constructor
1. Accessing class level variable
Assessing class level variable using this keyword is the most common use of "this" keyword.
Syntax: this.variableName
Most of the time we create some variable in class, then we can set the value from constructor or setter method. If we use same name for argument variable and class level variable then jvm will use local variable always, and it will not set the value to class level variable
lets take a look at example for better understanding,
As shown in the above example if we just use name =name, value from argument will not be assigned to the class level variable. So the class level variable will always be null. This is because we set value to same variable not the class level variable.
The correct solution is to use this.name = name;
2. Accessing class methods using "this" keyword
For calling the same class method we can use this keyword.
However using this keyword for calling same class method is optional. Because even if you don't use this keyword, jvm always calls the method from same class by default.
Syntax: this.methodName(arguments);
Following examples shows two cases of calling class method with and without this keyword. In both cases the same method is called.
public class Dog{
	public void testMethod(String[] args){
		printString();
		this.printString();
	}
	public void printString(){
		System.out.println("Success);
	}
}
Output:
Success
Success
3. For calling other constructor of same class
"This" keyword in java can be used to call other constructor of same class.
Some times we have different constructors with different parameters then you can reuse existing constructor using "this" keyword. We can call any type of constructor within any constructor. That is we can call default in parameterized, parameterized in defatul or parameterized in parameterized constructor.
Syntax: this() or this(args)
The most important thing to note is that the use of "this" for calling other constructor should be the first line in constructor.
Let's assume we have a class, let's call it SomeClass. In this class we have a default constructor and a constructor with variable. There is some default code that is required for at object creation. So we have added this code in default constructor. Now we need the same code from default constructor in parameterized constructor. So in this case we can call default constructor from another constructor using this();
public class SomeClass{
	private int variable ;

	public SomeClass(){
		// some code...
	}
	public SomeClass(int variable ){
		this()
		this.variable = variable ;
	}
}
Lets take look at real life examples for shape class. In this class we have length and breadth variables. we need two constructors. Fist constructor will take two arguments for length and breadth. Second constructor will take only one argument, this will be same value for length and breath.
public class Shape{
	private int length ;
	private int breadth;

	public Shape(int length ,int breadth){
		this.length = length ;
		this.breadth = breadth;
	}

	public Shape(int length ){
		this(length,length);
	}
}
In above examples we are reusing constructors using "this" keyword in java.
4. Using "this" keyword as return value in java
If you need to return current object instance we can use "this" keyword. Builder design pattern is one of the most common example of this case.
Let's look at an example for better understanding,
public class MenuBuilder{
	List<Menu> menus = new ArrayList<>();

	public MenuBuilder withAdd(){
		menus.add(new Menus("Add"))
		 return this;
	}
}
As you can see in the above example, we used "this" as return value in withAdd() Method. In above example withAdd() method returns the current class object.
5. Passing "this" keyword as argument to method
If we want to call some method and the method needs current class object as argument, we can use this keyword to pass the current class object instance.
We can pass this as argument to current class as well as another class methods.
public class City{
	private String name;
	private Country country;

	public City(String name){
		this.name= name;
	}
	public void setCountry(Country country){
		this.country = country;
	}
}
public class Country{
	private City capital;

	public void setCapital(String cityName){
		City capital = new City(cityName);

	// passing country class object using this keyword
		capital.setCountry(this);
		this.capital = capital;
	}
}
As shown in the above example, we have City and Country class. In City class setCountry() method needs object of Country class. So we have passed Country class instance using "this" keyword from Country class.
6. Passing "this" keyword as argument to constructor
Similar to passing as argument to another method we can also pass "this" keyword as argument to constructor of another class.
We can pass this as argument to constructor of current class as well as to constructor of another class.
public class City{
	private String name;
	private Country country;

	public City(String name, Country country){
		this.name= name;
		this.country = country;
	}
}
public class Country{
	private City capital;

	public void setCapital(String cityName){
	// passing country class object using this keyword
		City capital = new City(cityName,this);
		this.capital = capital;
	}
}
As shown in the above example, we have City and Country class. In City class constructor needs object of Country class. So we have passed Country class instance using "this" keyword from Country class.
Fast track reading
This keyword in java is used to refer current class objects
Using this keyword we can access current class instance variable, methods, or constructor
We can pass this keyword as argument to another method or constructor
We can return current class instance using this keyword
Super keyword in java is one of the most used and very important keyword.
In java super keyword refers immediate super(parent) class objects.
In java super keyword is only used in case of Inheritance. Whenever we create instance of class, parent class instance is also created. The parent class instance can be accessed by ' super' keyword.
So you might be wondering, if we have inheritance then we can access the parent class member directly. So why do we need super keyword?
The answer is, if we have same member in derived(child) and parent class, then there is an ambiguity for JVM. JVM can not use parent class member so it uses the child class member by default. In such a case we can use super keyword for referring the parent object members.
3 use cases of super keyword in java
Accessing parent class
Variables
Methods
Constructor
Accessing parent class variables
If we have variable with same name in parent and child class, then we need to use super keyword to access parent class variable.
Lets see an example for better understanding:
class Father {
    String hairColor = "Black";
}

class Son extends Father {
    String hairColor = "Blonde";

    public void printHairColor() {
        System.out.println("Parent hair color: " + super.hairColor);
        System.out.println("Child hair color: " + hairColor);
    }
}

public class Tester {

    public static void main(String[] args) {
        Son son = new Son();
        son.printHairColor();
    }
}
Output:
Parent hair color: Black
Child hair color: Blonde
In the above example we can see that we are having hairColor variable in Father and Son class. So in Son class we used super.hairColor to access variable from father class.
Accessing parent class methods
If we have any method with same name in parent and child class, then we need to use super keyword to access parent class method.
Lets see an example for better understanding:
class Father {
    String getHairColor(){
	return "Blonde";
    }
}

class Son extends Father {
    String getHairColor(){
	return "Blonde";
    }
    public void printHairColor() {
        System.out.println("Parent hair color: " + super.getHairColor());
        System.out.println("Child hair color: " + getHairColor());
    }
}
public class Tester {

    public static void main(String[] args) {
        Son son = new Son();
        son.printHairColor();
    }
}
Output:
Parent hair color: Black
Child hair color: Blonde
In the above example we can see that we are having getHairColor() method in Father and Son class. So in child class we have used super.getHairColor() to access method from father class.
Accessing parent class constructor
Super keyword can be used to call the parent class constructor. Using super we can call default or parameterized keyword.
In java every time we create an object of a class it calls the parent class constructor even if you don't specify. This is called as constructor chaining.
If we specify which constructor (default or parameterized) from parent class to call, it will call the specified constructor of parent class. If you don't specify which constructor to call, it always calls the default constructor of parent class. And if parent class does not have default constructor, then JDK throws compile time error.
We can call the parent class default constructor using super() similarly parameterized constructor using super(arg1, arg2...).
It is important that the super() should be the first line in the child class constructor.
Lets see an example for better understanding:
class Father {
    String hairColor = "Black";

    public Father(String hairColor) {
        this.hairColor = hairColor;
    }
    public void printHairColor() {
        System.out.println("Hair color is : " + hairColor);
    }
}
class Son extends Father {

    public Son() {
        super("Blonde");
    }
}

public class Tester {

    public static void main(String[] args) {
        Son son = new Son();
        son.printHairColor();
    }
}
Output:
Hair color is : Blonde
In the above example we can see that we are having public Father(String hairColor) in parent class. So in child Son class we used super("Blonde") to access parent class constructor.
Fast track reading
In java super keyword refers immediate parent class objects
In java super keyword is only used in case of Inheritance
Super keyword in java accesses parent class variables, methods or constructor
Super call for the parent class constructor should be the first line in the child class constructor
If you don't specify super() in child class, JVM will provide it implicitly
Every programmer writes code every day. But, writing code is not enough. Writing good and reusable code is important. If you don't know how to write reusable code, don't worry this blog will help you. In this blog we will learn Bridge pattern. It is one of the design patterns which helps to write small and reusable methods. We will use java to implement one bridge design pattern example.
What is bridge design pattern?
Bridge design pattern is one of the Structural design patterns. As the name suggests, bridge design pattern is used to connect two pieces of code. Also, sometimes we need to separate the code so that it is reusable and easy to maintain. And these separate pieces then can be joined together when needed by bridge design pattern.
Whenever we have two pieces of code with small different behavior, we can use bridge design pattern.
The most important steps in implementing bridge design pattern is to break the code into two parts - Abstraction and Implementation
Abstraction : It is the main functionality. It will contain the reference to the implementation. It refers to the core functionality.
Implementations : It is the piece of code that performs dynamic behavior. Code which we can take out from core method and implement separately.
Bridge design pattern real life example
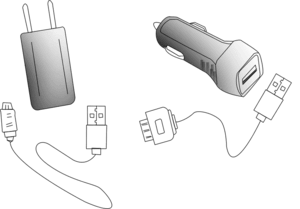
For understanding bridge design pattern we can take a real life example. It is very common now a days. Whenever we purchase any smartphone, we get a charger. The charger cable now-a-days can be separated, so we can use it to connect as USB cable to connect other devices.
As shown in image, we have 4 different chargers. 2 for house use and 2 for Car use.
If we implement bridge pattern then we just need 1 adapter each for house and for car use.
Similarly, in case of software development there are so many cases, where we need separate things to make more reusable code. In such cases bridge design pattern is used to have communication between the components.
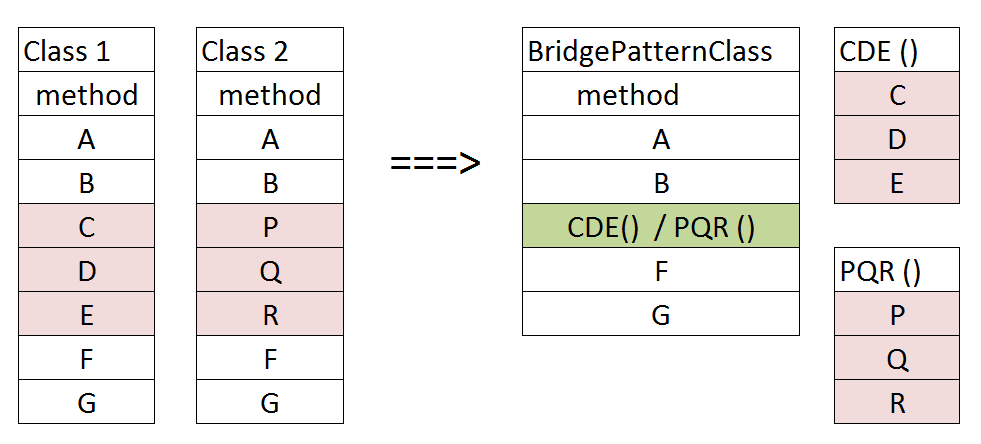
For instance, let's assume we have 2 classes Class1 and Class2. In these classes only some part of the code is different. You may want to reuse the same code. So the solution we can think of creating some function and use it. As shown in image.
Then the question arises how to write the class to use different method at run time. Do we need conditional statements? No there is another option. We can create another class and pass its object as argument. Then use this object to call the method. Depending on requirement we will pass different object. Even if this sounds complex, it is not. Let us simplify it a bit further.
Software example for bridge pattern
Almost in every application we need to store data. Let's assume we need to store in 2 different storage mechanisms file and database. Also, before we store, we have to process the object [validation, set some data etc.]. Normally we go with separate classes to do these processes as shown below:
SaveStudentInFile {
checkAccess;
validateObject;
setAuditFields;
openFileToWrite;
writeDataInFile;
closeFile;
return studentId;
}
SaveStudentInDB {
checkAccess;
validateObject;
setAuditFields;
openDbConnection;
storeDataInDb;
closeConnection;
return studentId;
}
We have code for storing Student object into file and database. This is a common scenario. Now let's assume, that we need to add code to do the same thing for course object also. Then we will need two more classes like SaveCourseInFile and SaveCourseInDB.
Also if we need to add new storage system like other database or network call, then we will have to create new class for each type. Like for our example Student class and Course class. This will keep increasing for each new class and storage type.
Bridge design pattern simplifies the above scenario by helping us write reusable code.
Steps to implement Bridge design pattern in java
As we know that we need to create two parts abstraction and implementations,
We will create two interfaces for abstraction and an implementor.
We are using interfaces as standard structure but depending on requirements, you can go with abstract or parent classes also
Creating interface or parent class for abstraction is not mandatory. However, if you are planning to make it more dynamic it is better to create either an interface or parent class
In the Abstraction we will need reference to implementor
You can do it in many ways by parameterized constructor, or method arguments
Abstraction will have function to perform main operation
Implementor will have function to perform dynamic part of code
We will create implementing classes for both
In example we have created one for abstractor and two for implementor. You can create as many as you need. You could have two on both side or two for abstractor and one for implementor
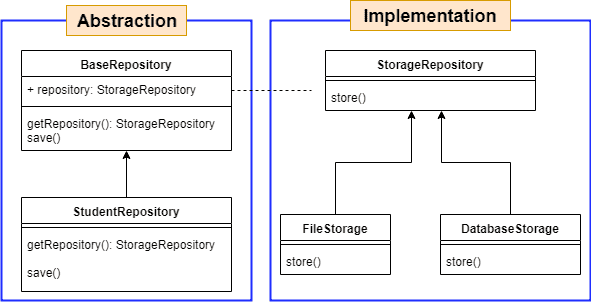
UML diagram for Bridge design pattern
Let see bridge design pattern solution implementation.
As shown in the image we will create separate code for storing in file and db. Then we use this in the core functions. This will solve the problem of adding new tables like course. After that we just need one class SaveCource. This class will use storage service to store into specific storage system.
Bridge design pattern implementation in java
We can implement design patterns in any language. Let's see how to implement above given example in java using bridge design pattern.
Firstly, let's create the model classes that we need. We will use one base class
public class BaseEntiy{
private Long id;
public Long getId() {
return id;
}
public void setId(String id) {
this.id = id;
}
}
public class Student extends BaseEntiy{
private String name;
public String getName() {
return name; {
}
public void setName(String name) {
this.name = name;
}
}
Now we will create interface for implementor as StorageRepository.java
interface StorageRepository{
    public void store(BaseEntiy entiy);
}
Now let's create two implementing classes for StorageRepository interface
class FileRepository implements StorageRepository{
public void store(BaseEntiy entiy){
try {
FileOutputStream fileOut = new FileOutputStream("filePath");
ObjectOutputStream objectOut = new ObjectOutputStream(fileOut);
objectOut.writeObject(entiy);
objectOut.close();
} catch (IOException e) {
e.printStackTrace();
}
}
}
class DataBaseRepository implements StorageRepository{
We have everything we need for implementor. Now let's create abstraction class for core functionality. We will create class for BaseRepository interface. It is not mandatory to create interface, you can also create abstract class. It is also possible to implement bridge design pattern with out BaseRepository. You can directly create StudentRepository.java
interface BaseRepository{
    public void save(BaseEntiy entiy);
    public StorageRepository getRepository();
}
Now lets create implementing class for storage BaseRepository
class StudentRepository implements BaseRepository {

    private StorageRepository repository;
    public StudentRepository(StorageRepository repository){
        this.repository=repository;
    }
	public StorageRepository getRepository(){
		return repository;
	}

     public Student save(Student student) {

        if (student == null || student.getName() == null) {
            return null;
        }
        student.setId(getNextId());
        repository.store(student);
        return student;
    }
}
Now we can use student repository with appropriate StorageRepository to achieve the functionality. While creating object of StudentRepository we can specify FileRepository or DataBaseRepository.
 public static void main(String[] args){
	// code to store in file
     StudentRepository fileRepositroy = new StudentRepository (new FileRepository());
     fileRepositroy.save(new Student() );

     // code to store in DataBase
     StudentRepository dbRepositroy = new StudentRepository(new DataBaseRepository());
     dbRepositroy.save(new Student() );
 }
Common usage
There are so many usage where we can use the bridge design pattern.
If any function is doing multiple things
We can separate into two functions
If class is doing multiple tasks
We can make separate classes
When we need code to be loosely coupled
Code should be less dependent on each other
Functionality or behavior can be changed dynamically
Run time behavior can be changes by providing different implementer class
Benefits of bridge design pattern
Increases code re-usability
Reduces the duplicate code
Increases code maintainability
if we need to change something, change at one place only
Increase the productivity as it saves both development and testing efforts
In order to ace your programming game, you should be able to write reusable code. Code re-usability is an important aspect of good programming practice. Design patterns help us follow such best practices. Singleton is most used design pattern. Most of us use it knowingly or unknowingly on daily basis. Sometimes we don’t realize because we use many different frameworks, that use them internally. For eg: Spring framework. So let's get started with understanding this pattern. This pattern is the easiest one to learn!!! Lets learn Singleton design pattern using Java.
What is a Singleton design pattern?
Reading the name of this pattern we can get a rough idea of what the pattern is all about, don’t we? Yes, it has something to do with single or unique instance of a class. Which means this design pattern helps us create a single instance of a particular class. As a result, we can say this as a pattern which enables us to reuse the same object. As this deals with creation of object it is a type of creational design pattern.
Now, one would think why do we need only a single instance of any particular class? Let us consider a scenario where you have an application, which requires a database connection. Now, there can be an approach where, you create a new database connection whenever your service needs it. But, if you have multiple such services, then, creating a new connection for each of them, can be a very costly operation. Which may eventually lead to many problems.
Thus having a single instance for the connection is beneficial. We can use the same connection to access the database as and when we want to. There are several such examples like Java Run-time class which also implements a singleton pattern to avoid unnecessary object creation. They also facilitate reuse of the object.
Where to use Singleton pattern
This pattern can be used in following cases:
Multi threaded Database applications
Want to limit the number of objects created in an application to save memory
This can be achieved by adapting getInstance() method we can create more than one but limited objects, eg some time we may need more than 1 instance or new instance after every 100 usage
Utility, service classes or every class other than models can be a singleton class
How does Singleton pattern work?
The main motto of this pattern is to "define a class that has only one instance, but has a global point of access to the instance". That means we create class in such a way that we have one instance and every time we need class instance we use same instance without creating new.
Well, how can we restrict a class to have only one instance? Because the default behavior of any constructor of a class is to provide a new instance on initialization. There are several ways in Java by which we can achieve the motto of this pattern. But all of them are based on the following basic ideas:
A private constructor to prevent others from instantiating the class : A private constructor cannot be accessed from outside the class. Thus, we cannot create an instance by invoking a constructor.
Then create the instance of the class either during class loading in a static field/block, or on-demand in a static method.
It is better to first check whether the instance exists or not and create a new one only if it doesn’t exist.
Make this instance available publicly. Means create way for all other parts of the application to access this instance.
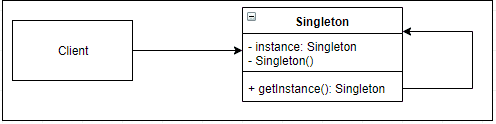
The following UML can show you the basic implementation of Singleton pattern.
Singleton pattern UML
Implementation of Singleton design pattern in Java
As mentioned above Singleton pattern can be implemented in various ways. These depend on the requirement of your code.
Let us see the implementation of some of them below:
Default or Eager initialized of Singleton pattern
As per the explanation above we have a class with a private constructor so that it cannot be accessed from outside the class. And a public method "getInstance()", which can be used to access the instance of our class. Then we have our main application which will call the print method using the existing instance.
package main.java.creational.singleton;
public class Singleton {
//create an object of Singleton
private static Singleton singleton = new Singleton();
//make the constructor private
private Singleton(){}
//Get the only object available
public static Singleton getInstance(){
return singleton;
}
public void print(){
System.out.println("Hello World!");
}
}
package main.java.creational.singleton;
public class Application {
There is another way to implement eagerly initialized singleton, by using a static block to create instance. The static block is executed only once at the time of class loading. The advantage of this method is that initialization logic or exceptions handling is done in the static block.
package main.java.creational.singleton;

public class EagerStaticBlockSingleton {

	private static final EagerStaticBlockSingleton instance;

	private EagerStaticBlockSingleton() {
	}

	static {
			instance = new EagerStaticBlockSingleton();
		}

	public static EagerStaticBlockSingleton getInstance() {
		return instance;
	}
}
Lazily initialized Singleton pattern
Let us first understand the meaning of Lazy initialization. Lazy initialization means the delay in initializing something until it is needed for the first time. Which in our context means that, a class is not initialized unless and until its instance is not needed. [for more details wiki]
This implementation first checks whether there already exists an instance of the class. If it is present then the same instance is returned. Otherwise a new instance is created and then returned.
package main.java.creational.singleton;

public class LazySingleton {

	 private static LazySingleton instance;

	    private LazySingleton() {}

	    public static LazySingleton getInstance() {
	        if(instance == null) {
	            instance = new LazySingleton();
	        }
	        return instance;
	    }
}
Lazily Initialized Inner Class Singleton
This way of implementation contains an inner class. This inner class is responsible to create a new instance. But this inner class is loaded only when the get instance is called, and hence lazy initialization is achieved.
package main.java.creational.singleton;

public class LazyInitInnerClassSingleton {

	private LazyInitInnerClassSingleton() {}

    /** This inner class is loaded only after getInstance() is called for the first time. */
    private static class SingletonHelper {
        private static final LazyInitInnerClassSingleton instance = new LazyInitInnerClassSingleton();
    }

    public static LazyInitInnerClassSingleton getInstance() {
        return SingletonHelper.instance;
    }
 }
Important point here is , the getInstance() method by default is not thread safe. Means in multi threaded environment this may not work as expected. There are two ways to handle it. Lets see both ways with differences.
Synchronized Singleton with single check
We read that the getInstance() method is not thread safe. Now, from the above example let's say we do not have a instance yet. Two threads enter getInstance() method simultaneously. Eventually, the if(instance == null) will evaluate to true for both the threads . Thus, they end up creating an instance for each of the thread.
Hence, using synchronized keyword for getInstance() makes sure that one thread enters getInstance() at a time and executes it.
Given below you can see 2 different ways of using synchronized keyword.
Make synchronized method : we can create the method as synchronizes so only one thread will enter and create instance if required
Adding synchronized block : we can add synchronized block and allow only one thread at a time
package main.java.creational.singleton;
public class SynchronizedSingleton
private static SynchronizedSingleton instance;
private SynchronizedSingleton() { }
public static synchronized SynchronizedSingleton getInstance(){
if(instance == null) {
instance = new SynchronizedSingleton();
}
return instance;
}
}
package main.java.creational.singleton;
public class SynchronizedSingleton
private static SynchronizedSingleton instance;
private SynchronizedSingleton() { }
public static SynchronizedSingleton getInstance() {
synchronized (SynchronizedSingleton.class){
if(instance == null) {
instance = new SynchronizedSingleton();
}
}
return instance;
}
}
As we know adding synchronize to method will allow only one thread at a time. So all other threads have to wait even if the instance is present. This will affect the performance. Don't worry there is solution for this, Lets see how to improve it.
Synchronized Singleton with double check
Now the problem is thread is waiting even if the instance is present.Why to keep waiting if the instance is already created. All the thread can use it simultaneously without waiting.
so we can add condition out side the synchronized block, if the instance is present just use it without going into synchronized block.
In this section, we have added a check if(instance == null) twice. You might be wondering why whave doble check can't just have one? No we can not have only one check.
This is important as because, if the two threads enter the method simultaneously, Both will evaluate to true. Further the threads will enter the synchronous block one by one. If there is no double-check then both will create instance one after another.
Thus, the second check avoids this scenario. Another point that you may notice in the code is the key word volatile. It prevents compilers from doing their own optimizations, eventually helping the singleton work correctly. Find more about volatile here.
Protection against reflection
Reflection is a set of APIs in java. These are really powerful APIs to access a class or to instantiate it. These can come into our way of achieving Singleton pattern in our implementation. Let us see how. This is our class to be instantiated,
package main.java.creational.singleton;

public class SingletonReflection {

	private static SingletonReflection singleton = new SingletonReflection();

	private SingletonReflection(){}

	public static SingletonReflection getInstance(){
	    return singleton;
	}
}
Note that we have a private constructor and a public method to access the instance. So far so good!! Now, let us see how the use of Reflection comes in the way of making the class Singleton.
In the output you can see two separate instances of our class are created. The constructor.newInstance() method from reflection APIs makes it possible to create a new instance even if the constructor is privatef. What can we do to avoid this? We can simply throw an exception in our constructor. If it is called when the instance of the class already exists it will throw this exception.
package main.java.creational.singleton;

public class SingletonReflection {

  private static SingletonReflection singleton = new SingletonReflection();

  private SingletonReflection(){
      if(singleton != null) {
             throw new IllegalStateException("Singleton already initialized");
      }
  }

  public static SingletonReflection getInstance(){
       return singleton;
  }
}
Benefits
Limits the objects creations
Reduces the memory required
Reduces garbage collection
Helps in Lazy initialization. That means, an object is not created until we need it and call the getInstance() method
Saves memory as the instances are reused
Limitations
Same object is shared hence the object must be immutable
We can not have class level variables
If we use they will be overridden by other client
Extra code need to write for making it singleton this increases complexity
The getInstance() method is not thread safe, but can be overcome by using synchronized keyword
Factory design pattern is the most commonly used design pattern in today's programming world. Let's have the study of this pattern on our agenda here. In this blog we will understand what is the Factory design pattern? When can it be used? What are the advantages and the drawbacks of using this pattern? But, the crucial thing that we learn here today is how to implement the factory design pattern in Java.
We will use examples to clarify the concepts of this pattern. At the end of this session, we will achieve 2 goals:
Be able to analyze our requirement or code and decide whether we can apply factory pattern to it
And, actual application and implementation of the factory design pattern in java
What is a Factory design Pattern?
A Factory design pattern also known as the "Factory Method pattern" is a type of Creational design patterns. By the name we can guess it produces or creates something, in our case objects. This design pattern deals with object creation without providing a specific class type for the object.
Factory pattern
Now one might think, how can there be a situation where the program does not know which objects to create? To answer this question, consider a scenario where we want to send a notification to the user. There are 2 ways in which the user can receive the notifications. One is either by an email, or as an SMS.
Now the user decides at run time in which format he wants to receive the notification. As a result, our program doesn't know until runtime which notification object to create.
This is where Factory method pattern comes to our rescue. Let's take a closer look at how this pattern solves our problem.
Notification sender factory
In the figure above you can see two different users with different needs for notification. One prefers email notification while other prefers SMS/mobile notification. Thus typically our implementation for both the notifications is not the same. And because of this our application doesn't know which notification to send until the user tells it at the run time.
To solve this problem we instantiate a factory in the factory pattern. This factory is then responsible to give us the object of the type specified at run time.
Where to use Factory Pattern
We need to create different type of objects
Object creation is dynamic – at run time we need to decide which object to be created
Different methods contain same object creation code
How does the Factory Pattern work?
Firstly, what the Factory pattern does is, it replaces the object creation (using 'new') by a factory method. This factory method in turn creates objects for us using 'new'. So, the question arises isn't the removal of 'new' from one part of the code just to add it to some other part of the code pointless?
Consider this, now we have a separate method to create objects. Hence, this method can be used by different classes to create objects at run time.
Our code that will further use these objects is called as the client code. This client is unaware of the exact type and creation process of the object. Thus, It treats all the objects as the they are of base type. Which means in our example above, our client will not know whether the object it receives is a object of type Email or SMS. It will treat all the objects as if they are objects of type Notification.
Now, we shall take our example and try to implement it. Also, you can try implementing as you read this blog. And, tell us in the comment section below whether you were successfully able to implement the pattern or not.
Implementing Factory Design Pattern in Java
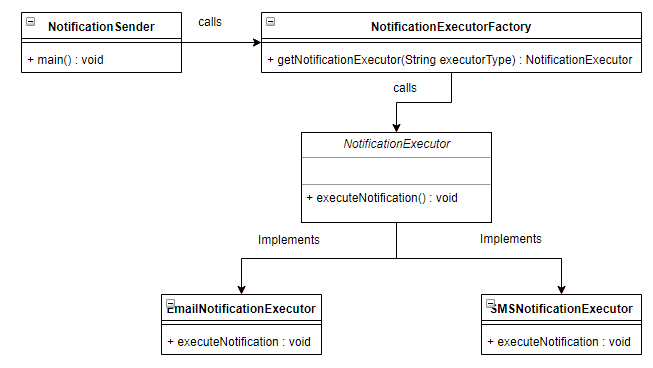
UML- Factory pattern
Let us further, understand the UML diagram given above.
As discussed above we have two type of notifactions to send Email and SMS. So we have created 'NotificationExecutor' interface, And two classes namely, 'EmailNoificationExecutor' and 'SMSNotificationExecutor' to implement this interface. Each one of these implementations have their own version of the method 'executeNotification()' within them.
Then we have created 'NotificationExecutorFactory' for providing the instance of a 'NotificationExecutor'
We will use getNotificationExecutor() of factory class to get the desired instance by type
Client class called 'NotificationSender' will use factory to get instance and triggers notification sending action.
Thus, depending upon the parameter passed to the method 'getNotificationExecutor(String executorType)' of 'NotificationExecutorFactory', the overridden method 'executeNotification()' of either of the two implementations of 'NotificationExecutor' is called.
How to do in Java
After we have understood the flow of the pattern with the above UML, we shall now proceed with the programmatical implementation of the Factory pattern in Java. As per the diagram above,
1) Firstly, let us create an interface for notification executors,
package main.java.creational.factorymetthod;

public interface NotificationExecutor {
      public void executeNotification();
}
2) Secondly, we will create 2 implementing classes for this interface. These classes will then override the 'executeNotification()' method according to their sending mechanism. These implementations will look like this
package main.java.creational.factorymetthod;

public class EmailNotificationExecutor implements NotificationExecutor {

        @Override
        public void executeNotification() {
           System.out.println("Email notification sent");
        }
}
This being 'EmailNotificationExecutor', and the other one being 'SMSNotificationExecutor'
package main.java.creational.factorymetthod

public class SMSNotificationExecutor implements NotificationExecutor {

       @Override
       public void executeNotification() {
          System.out.println("SMS notification sent.");
       }
}
3) Then, what we need is a factory to generate the instances of the specific executors according to the 'executorType'
package main.java.creational.factorymetthod;

public class NotificationExecutorFactory {

       public static NotificationExecutor getNotificationExecutor(String executorType) {
       if(executorType.equals("Email"))
         return new EmailNotificationExecutor();
       if(executorType.equals("SMS"))
         return new SMSNotificationExecutor();
       return null;
     }
}
4) And finally, we create a class that triggers our notification action
package main.java.creational.factorymetthod;

public class NotificationSender {

       public static void main(String[] args) {
 NotificationExecutorFactory.getNotificationExecutor("Email").executeNotification();
     }
}
Here we can see, first we get the executor instance of the type 'Email' as per the argument to getNotificationExecutor() method. Lastly, the respective implementation of method executeNotification() is invoked for that instance.
Benefits
Creation of different types of objects is possible at run time
It separates the object creation logic from the object usage logic
Removes duplicate code
Thus, makes changing or addition to object creation easier
Limitations
The different types of objects created must have the same parent class
The addition of new classes and interfaces could increase the complexity of the code
An important point of writing code in Object Oriented Programming is Object/Instance creation. Any program requires a considerable amount of object creation. Wouldn't it be nice if we had some standard ways to create objects? Hence, came the creational design patterns. These provide standardized pathways to create instances. Abstract Factory pattern in java is one such design pattern.
Let us now take a closer look at Abstract Factory Pattern. In this blog you will find a 7 step approach to understand and implement this pattern. Feel free to leave a comment below, about what do you think of the post and also do share your views on the pattern if you have used it before.
What is Abstract Factory Pattern?
Abstract factory pattern falls into "Creational design pattern" category. Abstract factory design pattern is used to mange different object types of same family. All the object should belong to same family but they are of different categories.
In other word we can say that we have some objects and they are grouped. These objects have some meanings in group. Two objects from different group can not be mixed.
Solution using abstract design factory
For example we have two groups of utensils Microwave safe and non microwave safe products. If we need microwave safe products we should use microwave safe bowl, plate and cup. We can not mix microwave safe and non microwave safe. When we need to avoid mixing we can use abstract factory pattern by creating factories for each.
Microwave safe factory
Non Microwave safe factory
[wiki] Creating an object often requires complex processes. The object's creation may lead to a significant duplication of code. The factory method design pattern handles these problems by defining a separate method for creating the objects.
This pattern is useful when we have large number of objects in our program. This pattern classifies them into "Families".
Abstract Factory pattern adds a "Factory" that brings together all these factories. Further, it decides at run time which factory should be invoked. This later creates an object of a specific family. Therefore, this pattern is also known as "A Factory of Factories". Abstract Factory Pattern in java encapsulates a group of factories in the process of object creation .
The essence of this pattern is that, it separates the object creation from the object usage. Apart from that, this pattern also creates families of related objects. This helps to keep related objects together and different groups can not be mixed
When can we use Abstract Factory Pattern?
The system has multiple types (families) of objects
As a result, if we need different object or functions they should be from the same group
The system needs to create or compose objects at run time according to the user input
The system need different function but they should be in groups
If a(), b(), c() and p(),q(),r() two groups of functions, if we call a() then we can call either function b() or function c() only.
7 Steps to Implement Abstract Factory Pattern:
Find out the different object types in the application
Create Interface and implementing classes for each type For eg, Utensils : Plate, Bowl, Cup, Plate_MW, Bowl_MW, Cup_MW ( _MW is used for microwave safe products)
Create factory classes to group the classes
Microwave safe: Plate_MW, Bowl_MW, Cup_MW
Non Microwave safe: Plate, Bowl, Cup
Declare Abstract factory interface and declare all required methods from factory
Implement Abstract factory interface by created families
Create code which will use Abstract factory to get factory and then call the methods on that factory
Use the abstract factory in the code instate of objects directly
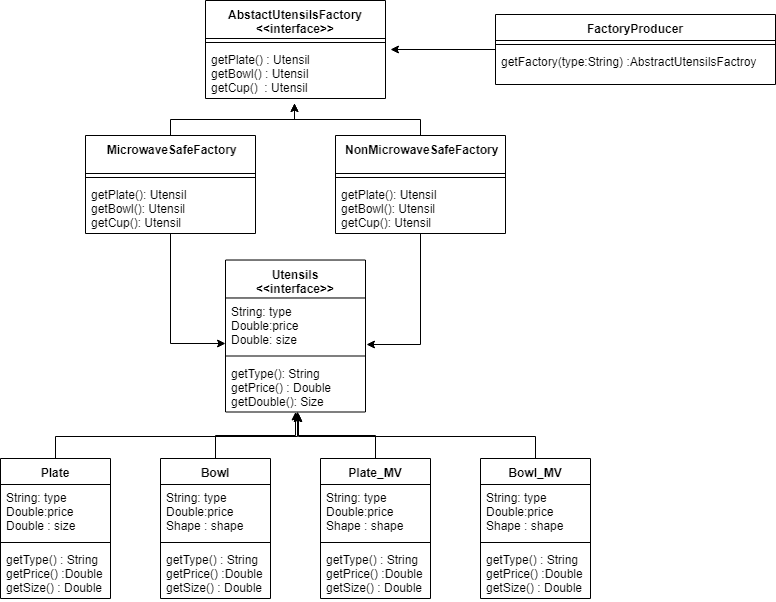
UML : Basic understanding of the implementation
This is the UML diagram of the example discussed above for microwave safe and non microwave safe products.This diagram explains the basic blocks in abstract factory design pattern. Further in the blog, we will use the java code implementation of this example.
Abstract Factory Pattern Java Implementation
Now, let us take a look at how to implement Abstract Factory Pattern in Java.
To begin with, consider a use case where we have a client application that produces different types of utensils. There are 2 major categories(factories) of utensils "Microwave safe" or "Non-Microwave safe". And the factories can create different types of utensils for eg: Plates, Bowls etc.
We will need Interface for parent type as Utensil
public interface Utensil{
     public String getType();
     public Double getPrice();
     public Double getSize();
}
Now, we will create some classes for utensils Plate, Bowl, Cup, Plate_MW, Bowl_MW, Cup_MW ( _MW is used for microwave safe products)
public class Plate implements Utensil{
String type;
.... Other variables....
	public Plate() {
		this.type = "PATE";
	}
  ... code for other method implementations....
}

public class Bowl implements Utensil{
  ... code with method implementations
}

public class Bowl_MW implements Utensil{
  ... code with method implementations
}

public class Cup_MW implements Utensil{
  ... code with method implementations
}
We have two different type of utensils microwave safe and non microwave safe, as a result, we create factory classes
public class MicrowaveSafeFactory {
public Utensil getPlate() {
return new Plate();
}
public Utensil getBowl() {
return new Bowl();
}
public Utensil getCup() {
return new Cup();
}
}
public class NonMicrowaveSafeFactory {
public Utensil getPlate() {
return new Plate_MW();
}
public Utensil getBowl() {
return new Bowl_MW();
}
public Utensil getCup() {
return new Cup_MW();
}
}
Further, we will create our AbstractUtensilFactory interface. It groups the other factories together.
public interface AbstractUtensilFactory {
	public Utensil getPlate();
	public Utensil getBowl();
	public Utensil getCup();
}
Now we will implement the AbstractUtensilFactory interface by the factories created earlier.
public class MicrowaveSafeFactory implements AbstractUtensilFactory{
  ..... ..... .....
}

public class NonMicrowaveSafeFactory implements AbstractUtensilFactory{
  ..... ..... .....
}
Finally, all code is in place and we need to use it. Because, we have two factories, we need to get the appropriate factory first. Once we get the factory we can call the require methods from the factory . Let's create a class FactoryProducer which will provide the factory instance as per the requirement.
There are different ways to implement the classes. there are also optimized ways. we have created as simple as possible for understanding purpose
public class FactoryProducer {
	public static AbstractUtensilFactory getFactory(String choice){

        if("Microwave".equalsIgnoreCase(choice)){
            return new MicrowaveSafeFactory();
        }
        else if("Non-Microwave".equalsIgnoreCase(choice)){
            return new NonMicrowaveSafeFactory();
        }
        return null;
    }
}
Now, we can start using the produces and factory classes where ever we need.
public class Application {
   public static void main(String[] args) {
      AbstractUtensilFactory utensilFactory = FactoryProducer.getFactory("Microwave");
      Utensil utensil = utensilFactory.getPlate();
      utensil.getPrice();
   }
}
Eventually, in the main method you can see that if we use utensilFactory to get plate, bowl or cup we will get microwave safe utensils only.
Benefits of using abstract factory pattern
Firstly, it helps to group related objects or functions
Also, reduces errors of mixing of objects or functions from different groups
Helps to abstract code so that user don't need to worry about object creations
Limitations
Only useful when we have to group processes or objects
Before getting object or calling the function we need to get the factory which adds one more processes
Adds more classes and abstraction hence code could become complex
Fast track reading
Most important point, it is a type of “Creational design pattern”
Mange different object types of same family
Also known as "Factory of factories"
It is different from the Factory pattern because it has multiple functions
Every day millions of lines of code is written. Most of the code is rewritten. Many a times there is a small change in requirement and old code doesn’t fit. What if we adapt the code so that it becomes reusable? Adapter design pattern in java helps to reuse the existing code even if it is incompatible. You can learn and use this approach while developing any application.
With real life and software examples we will see how to reuse the things even if they are not compatible with each other. You can leave a comment on how you feel about the post or if you have already used this pattern you can share the experience with us.
What is adapter design pattern?
Adapter design pattern in java is a structural design pattern. It provides solution for helping incompatible things to communicate with each other. It works as an inter-mediator who takes output from one client and gives it to other after converting in the expected format. Adapter pattern is also known as wrapper. [wiki]
For understanding adapter design pattern, we can look at the real world adapters or inter-mediators. Like, consider we have two water pipes of different sizes, and we want to connect them. We can not connect directly. So what can we do in such a case? As shown in the image below, we can use reducer. Here the reducer acts as an inter-mediator helping us to join the two pipes.
Similarly, in case of software development there are so many cases where we need inter-mediators. In such cases Adapter pattern in java is used.
import java.util.Scanner;
public class Test{

     public static void main(String []args){
	String a = new Scanner(System.in).nextLine();
        process(a);
     }

    public static void process(integer a){
        System.out.println("Square of "+a +" is "+ (a*a));
    }
}
Output:
error: incompatible types: String cannot be converted to int
As you can see in above code we have string type variable. Therefore, even if we want to call process() function we can not. Because it takes integer parameter as input. Hence, we need to create another method which can process a string or need to find way to convert String into integer format. The method which will do this processing is the Adapter method.
Adapter design pattern structure
The figure above shows the basic structure and flow of the adapter design pattern. We can see, there are 2 processes Process1 producing OutputA and Process2 that requires input from Process1. But in some cases, the output produced by Process1 is not of the same form as that required by Process2. Hence, An adapter is introduced between both the processes. What is the purpose of this adapter? It is nothing but a piece of code or a process that converts OutputA into a format which Process2 can use i.e OutputB.
Where can this pattern be used?
There are many cases where we can use the adapter design pattern.
To call function with parameter but don't have same parameters - In such cases we can convert to expected format and then call the function like integer to string
We have different type of class than we need : then we can use adapter to convert class type like student to person
Datatype of field is different than we need to process - we can convert field like string to int parsing
Real life example of adapter design pattern
There are so many examples where we use adapter patterns. One of the example we can consider of language translator.
As shown in image there are two people one can speak English and other speaks German. Therefore, there is no way they can communicate. Then they find another person who speaks both the language who helps them communicate.
Adapter design pattern example in software
Let's assume an example of a student who becomes an employee after candidate selection process.
We have two model objects Student.java and Employee.java. Student model is for storing the student data. Employee model stores the employee data.
public class Student {
    int rollNumber;
    String name;
    Date dob;
    .. getter and setter ...
}

public class Employee{
    int employeeId;
    String name;
    Date dateOfBirth;

    public Employee(int employeeId, String name, Date dateOfBirth) {
        this.employeeId = employeeId;
        this.name = name;
        this.dateOfBirth = dateOfBirth;
    }
    .. getter and setter ...
}
We have a EmployeeService.java class. This class creates as well as stores employee data.
public class EmployeeService{

    public void saveEmployee(Employee e){
		 .. code to create employee record
    }
}
Now let's create the code for interview selection process. The input will be student object. If interview is successful then we need to create employee record.
public class PlacementService{
    EmployeeService employeeService = new EmployeeService();
    public void process(Student student){
        // conduct interview
        // if selected in interview
        employeeService.saveEmployee(EmployeeAdaptor.getEmployee(student));
    }
}

public class EmployeeAdapter{
    public static Employee getEmployee(Student s){
        return  new Employee(s.getRollNumber(),s.name,s.getDob());
    }
}
If you have noticed, in above code we have created another class called EmployeeAdapter.java. As we have Student.java class and we can only pass employee data to saveEmployee() function. Therefore, we needed another code which can do the magic of converting student to employee.
One of the most important point to note here is that it is not necessary to name class as "Adapter". You can name class anything you want, like EmployeeUtil or StudentEmployeeMapper etc.
Benefits
Firstly, helps to reuse existing code
Secondly, incompatible code can communicate with each other
Additionally, alternate form of the class creation is possible
Also, adapter makes things work after they're designed
We can provide data in requested format even if we do not have
Limitations
The two objects must be similar or must have same features
For eg: Adapting a Student object to Department object is unlikely, but Adapting a Student object to Employee object is possible
Performance affected due to extra processes
All the processes communicate through adapters only
Fast track reading
Adapter design pattern is of structural type
Also known as wrappers
Solution for helping incompatible things to communicate with each other
Software Design patterns are very important part of any developers life. Everyday we do many things. For instance, bag packing, cooking, building something or writing some software code. We can either do the way things come into our mind, or we can use our or experts' experiences and suggestions.
There are so many things we all do repeatedly. There are some solutions and best practice guidelines that help to remove or reduce the repetition and consequently, achieve best results.
Without design pattern
Using design pattern
The best described solutions for the most common as well as repeating problems of software developers are called as design pattern. These are the solutions obtained by experienced developers.
Most importantly, they are not a solution to a specific problem however, they are concepts. In short, design patterns are the blueprints of solutions to different types of problems. Therefore, for any software development there are many scenarios where you can use design patterns.
Who Should use design pattern?
Design patterns are not the programming language specific like java, C# or .net. So, it does not matter which programming language you are working with. Some of these design patterns are so straight forward that we implement them in our code without even realizing it.
Why we should use design patterns?
We can develop any software application without using the design patterns. However, using design patterns add many benefits to programming.
Provides widely accepted guidelines which are tested by experts
Design patterns make code reusable
More maintainable
Speed up development process
Reduce bugs in the code
For example, when you write some code in java and your fellow programmer later tries to add extension to your code. For this purpose he needs to understand the flow of the code. Now, if you have used java design patterns he will be able to understand easily as you have followed common solution.
What is Gang of four?
Four authors Erich Gamma, Richard Helm, Ralph Johnson and John Vlissides published book "Design Patterns: Elements of Reusable Object-Oriented Software". They introduced design patterns for software development, consequently they were known as the Gang of four(GOF).
These patterns are used when we need to create new objects.
Sometimes object creation is not simple task. It could be complex process. In other words, it may involve may steps or may need more resources like time, memory or processing power. In such cases we can use Creational design patterns. These design patterns deal with creation of classes or objects. Moreover, It helps to increase re-usability and flexibility of the code.
Singleton : Exactly one instance is present. Therefore, entire application uses the same object
Prototype: Copy from existing product and make changes if required
Factory Method: Create different objects according to request
Abstract Factory : Create different factory according to request. Also called as factory of factory
Builder : Helps to create object step by step
Object Pool : Reuse the object which are not in use any more. Consequently, avoid creation of very expensive objects
Dependency Injection pattern: Get object from injector service, who is responsible for creating objects.
Lazy initialization pattern: At the time of first use object is created
Structural design pattern
Structure defined for a building
Structural design patterns are used to design the class structure and architecture.
We can use these for creating new functionality or extending the existing functionality.
Many times we come across a scenario where we have incompatible objects.For instance, consider we have mobile and charger of different companies. As a result, we can not connect them because they are not compatible.
Likewise, assume that we have java code for MySQL database but we have Oracle database. In such cases we need to create some small project. This project will help both of them communicate. This solution can be called as Java Structural design pattern implementation.
Adapter: Provides the solution for helping incompatible things to communicate with each other
Bridge: Separates things so that they can work independently as well
Composite: Allows to operate objects in a tree structure hierarchy
Decorator: Allows to add new functionality to existing object
Facade: Provide the simple interface to use many small systems. Additionally, hides the complexity by wrapping the different process. We can use without knowing each process
Flyweight: Allows to reuse the object if available otherwise create new and store in memory
Proxy: Represents the functionality of other object. Protect original object from direct access to prevent damage
Behavioral design patterns
Clicking on button changes status of light
Behavioral design patterns are used to define class behavior.
In most of the cases we have seen that somethings are dependent on others. For instance, when we do some online payments we get notifications. Similarly, when you need tickets you first do the payment then you get tickets.
To sum it up, Behavioral design patterns deal with the communication between the objects, and behavior of the object is dependent on the another
Chain of responsibility: Create chain of processes and execute one after another consequently for the request
Command: Convert each request into individual command or action for execution
Interpreter: Evaluates the meaning of expression
Iterator: Accesses sequential elements from the group of elements
Mediator: Provide intermediate solution for communicating the objects. Additionally, This reduces the complexity. Using this two classes don’t communicate directly
Memento: Keeps track of previous states. This help to restore to any state if we need
Observer: Keeps observing the target . Takes the action if state of target changes
State: Different behavior according to different states
Strategy: Behavior is dependent on the environment /context or input
Template: Create structure/format, reused by many classes
Fast track reading
Best described solution for the most common and repeating problems of software developers are called as design patterns.
Firstly, they are not a solution to a specific problem
Secondly, Design patterns are not programming language specific
In software development there are many scenarios where you can use design patterns
Additionally, solutions are provided and accepted and tested by experts
Originally introduced by Gang of four (GoF)
3 main categories, Creation pattern, Structural pattern and behavioral pattern
We use cookies to ensure that we give you the best experience on our website. If you continue to use this site we will assume that you are happy with it.