While developing a spring boot application, sometimes we need to run a method or a piece of code at startup. This code can be anything ranging from, logging certain information to setting up database, cron jobs etc. We cannot just put this code in constructor, because required variables or servies may not be initialized yet. This could lead to null pointers or some other exceptions.

Why do we need to run code at spring boot startup?

Call method after start up

We need to run method at application startup for many reasons like,

  • Logging important things or message saying application is started
  • Processing database or files, indexing, creating caches etc.
  • Starting background process like sending notification, fetching data form some queue, etc.

Different ways to run method after startup in spring boot

Each way has its own benefits. Let's look in detail to decide which we should use,

  1. Using CommandLineRunner interface
  2. With ApplicationRunner interface
  3. Spring boot Application events
  4. @Postconstruct annotation on a method
  5. The InitializingBean Interface
  6. Init attribute of @bean annotation

1. Using CommandLineRunner interface

CommandLineRunner is a spring boot functional interface which is used to run code at application startup. It is present under package org.springframework.boot.

In startup process after the context is initialized, spring boot calls its run() method with command-line arguments provided to the application. 

To inform spring boot about our commandlineRunner interface, we can either implement it and add @Component annotation above the class or create its bean using @bean.

Example of implementing CommandLineRunner interface

@Component
public class CommandLineRunnerImpl implements CommandLineRunner {

    @Override
    public void run(String... args) throws Exception {
        System.out.println("In CommandLineRunnerImpl ");

        for (String arg : args) {
            System.out.println(arg);
        }
    }
}

Example of creating bean of CommandLineRunner interface

@SpringBootApplication
public class Application {

    public static void main(String[] args) {
        SpringApplication.run(Application.class);
    }

    @Bean
    public CommandLineRunner CommandLineRunnerBean() {
        return (args) -> {
            System.out.println("In CommandLineRunnerImpl ");

            for (String arg : args) {
                System.out.println(arg);
            }
        };
    }
}

We can run application using command line or IDE. Let's take an example when we run the application using arguments as "--status=running"

mvn spring-boot:run -Dspring-boot.run.arguments="--status=running"

OR

mvn package 
java -jar target/<FILENAME.JAR HERE> --status=running

This will produce the following log output:

In CommandLineRunnerImpl
status=running

As we can see, the parameter is not parsed but instead interpreted as a single value "status=running".

To access command line arguments in parsed format we need to use ApplicationRunner interface. We shall look at it shortly.

Spring Boot adds CommandLineRunner interface into the startup process. Hence throwing exception in commandlinerRunner will force Spring boot to abort startup.

We can create multiple CommandLineRunners in one application. Using the Ordered interface or @Order annotation we can configure the order in which they should run. Lower value means higher the priority. By default all the components are created with lowest priority. That is why components without order configuration will be called last.

We can use order annotation as shown below

@Component
@Order(1)
public class CommandLineRunnerImpl implements CommandLineRunner {
    ........
}

2. With ApplicationRunner Interface

As discussed earlier, to access parsed arguments we need to use ApplicationRunner interface. ApplicationRunner interface provides run method with ApplicationArguments instead of raw string array.

ApplicationArguments is an interface which is available from srping boot 1.3 under the package org.springframework.boot.

It provides different ways to access the arguments as below

String[] GetSourceArgs()Gives unprocessed arguments that were passed to the application
Set<String> getOptionNames()Names of all optional arguments, optional arguments are preceded by "--" eg: –name= "stacktrace"
List<String> getNonOptionArgs()Returns unprocessed non-optional arguments. Arguments without "--"
boolean containsOption(String name) Checks if name is present in the optional arguments or not
List<String> getOptionValues(String name)Gives the argument value by name

Method getOptionValues returns value list because, the argument value can be array as we can use same key more than once in the command-line.
For example –name= "stacktrace" -- Port=8080 --name="guru"

Example of Application runner as interface implementation

Let's run the program below using "status=running --mood=happy 10 --20" arguments and let's understand the output

@Component
public class ApplicationRunnerImpl implements ApplicationRunner {

   @Override
   public void run(ApplicationArguments args) throws Exception {

      System.out.println("ApplicationRunnerImpl Called");

//print all arguemnts: arg: status=running, arg: --mood=happy, 10, --20
      for (String arg : args.getSourceArgs()) {
         System.out.println("arg: "+arg);
      }
      System.out.println("NonOptionArgs: "+args.getNonOptionArgs()); //[status=running,10]
      System.out.println("OptionNames: "+args.getOptionNames());  //[mood, 20]

     System.out.println("Printing key and value in loop:");
      for (String key : args.getOptionNames()) {
         System.out.println("key: "+key);     //key: mood  //key: 20
         System.out.println("val: "+args.getOptionValues(key)); //val:[happy] //val:[]
      }
   }
}

Output:

ApplicationRunnerImpl Called
arg: status=running
arg: --mood=happ
arg: 10
arg: --20
NonOptionArgs: [status=running , 10]
OptionNames: [mood, 20]
Printing key and value in loop:
key: mood
val: [happy]
key: 20
val: []

CommandLineRunner and ApplicationRunner have similar features like

  • An exception in the run() method will abort application startup 
  • Several ApplicationRunners can be ordered using Ordered interface or @Order annotation

Most important point to note that the Order is shared between CommandLineRunners and ApplicationRunners. That means the execution order could be mixed between commandlinerRunner and applicationRunner.

3. Application event in Spring Boot

Spring framework triggers different events in different situations. It also triggers many events in startup process. We can use these events to execute our code, for example ApplicationReadyEvent can be used to execute code after spring boot application starts up.

If we don't need command-line arguments, this is the best way to execute code after application starts up.

@Component
public class RunAfterStartup{

@EventListener(ApplicationReadyEvent.class)
public void runAfterStartup() {
    System.out.println("Yaaah, I am running........");
}

Output:

Yaaah, I am running........

Some most important events in spring boot are,

  • ApplicationContextInitializedEvent : triggered after ApplicationContext is prepared and ApplicationContextInitializers are called but before bean definitions are loaded
  • ApplicationPreparedEvent : triggered after bean definitions are loaded
  • ApplicationStartedEvent : triggered after context has been refreshed but before command-line and application runners are called
  • ApplicationReadyEvent : triggered after any application and command-line runners are called
  • ApplicationFailedEvent : triggered if there is an exception on startup

Multiple ApplicationListeners can be created. They can be ordered with the @Order annotation or Ordered interface.

The order is shared with other same type of ApplicationListeners but not with ApplicationRunners or CommandLineRunners.

4. @Postconstruct annotation on a method

A method can be marked with @PostConstruct annotation. Whenever a method is marked with this annotation, it will be called immediately after the dependency injection.

A @PostConstruct method is linked to specific class hence it should be used for class specific code only. There can only be one method per class with postConstruct annotation.

@Component
public class PostContructImpl {

	public PostContructImpl() {
		System.out.println("PostContructImpl Constructor called");
	}

	@PostConstruct
	public void runAfterObjectCreated() {
		System.out.println("PostContruct method called");
	}

}

Output:

PostContructImpl Constructor called
postContruct method called

Point to note is that if class is marked as lazy, that means the class is created when requested. After that the method marked with @postConstruct annotation will be executed.

The method marked with postConstruct annotation can have any name, however must not have any parameters. It must be void and should not be static.

Please note that @postConstruct annotation is part of Java EE module and it is marked as deprecated in Java 9 and removed in Java 11. We can still use it by adding java.se.ee into the application.

5. The InitializingBean Interface

The InitializingBean solution works exactly the similar to the postConstruct annotation. Instead of using annotation we have to implement an InitializingBean interface. Then we need to override void afterPropertiesSet() method.

InitializingBean is a part of org.springframework.beans.factory package.

@Component
public class InitializingBeanImpl implements InitializingBean {
    public InitializingBeanImpl() {
        System.out.println("InitializingBeanImpl Constructor called");
    }
    @Override
    public void afterPropertiesSet() throws Exception {
        System.out.println("InitializingBeanImpl afterPropertiesSet method called");
    }
}

You must be thinking what happens if we use both @PostConstruct annotation and InitializingBean together. Well in that case @PostConstruct method will be called before the InitializingBean's afterPropertiesSet() method.

6. Init attribute of @bean annotation

We can provide a method using initMethod property in the @Bean annotation. This method will becalled after bean is initialized.

The method provided in initMethod must be void and should not have any arguments. This method can even be private.

public class BeanInitMethodImpl {
 
    public void runAfterObjectCreated() {
        System.out.println("yooooooooo......... someone called me");
    }
} 

@SpringBootApplication
public class DemoApplication {
    public static void main(String[] args) {
        SpringApplication.run(DemoApplication.class, args);
    }

    @Bean(initMethod="runAfterObjectCreated")
    public BeanInitMethodImpl getFunnyBean() {
        return new BeanInitMethodImpl();
    }
 }

Output:

yooooooooo......... someone called me

If you have InitializingBean implementation and initMethod property of @Bean annotation for the same class, then afterPropertiesSet method of InitializingBean will be called befor ehte initMethod.

Combining different approaches:

Lastly, sometimes we may need to combine multiple options. Then they will execute in the following order,

  • Constructor
  • PostContruct method
  • afterPropertiesSet method
  • Bean init Method
  • ApplicationStartedEvent
  • ApplicationRunner Or CommandLineRunner depends on Order
  • ApplicationReadyEvent

Fast track reading

  • There are different ways to run code after spring boot application startup
  • We can use CommandLineRunner or ApplicationRunner Interface
  • Use ApplicationRunner interface to access parsed arguments  instead of raw string array
  • Spring boot event executes code on application startup
  • Method marked with @PostConstruct annotation executes after the object initialization
  • afterPropertiesSet() method of InitializingBean Interfacecalled after the object initialization
  • @Bean annotation has an attribute 'initMethod' to provide method which will be called after bean initialization

Related topics

For every Java developer Hibernate, Spring are everyday terms. Although recently there was an addition to this list of 'Spring-boot'. Now-a-days Spring Boot is one of the most used open source framework. Hence if you are a java developer you must know about spring boot. In this tutorial we will cover srping boot features in detials.

Spring-boot can be used to create stand-alone and web enterprise applications with minimal effort. The most important part of this framework is that it makes development very convenient by removing lengthy, repetitive boilerplate code and common configuration steps.

Is it worth learning Spring Boot?

Yes, of course. Java is one of the most popular and most used programming language. Java with spring is the most powerful combination. After releasing spring boot it has got even more popularity. Spring boot has made things very easy. So learning spring boot will definitely help.

What is basic requirement to setup a spring boot project?

System Requirements for spring boot project setup are

JavaJava 8 or above
Spring FrameworkSpring Framework 5.2.8.RELEASE or above
Maven Or Gradle Maven 3.3 + Or gradle 6.3+

Things that make Spring boot Awesome!

Reasons why spring boot is most used:

  • Quick and easy Project setup
  • Production ready Spring applications ready in few and easy steps 
  • Easy to understand and develop application
  • Increases productivity-reduce the development time for redundant code
  • Auto configuration is possible
  • Dependency management handled internally
  • Provide opinionated 'starter' dependencies to simplify your build configuration

Spring-Boot Features:

  1. Auto dependency management using Spring Boot starters
  2. Application Entry point denoted by @SpringBootApplication
  3. Auto configurations
  4. Component Scan
  5. Externalized Configuration
  6. Out of the box spring data jpa support

1. Auto dependency management using Spring Boot starters:

Any project, even a standalone project, is dependent on some libraries for something. These libraries are available as dependencies/jars. Sometimes it happens that even these libraries are dependent on some other libraries. Most of the times they need specific versions. If the related dependency is missing or versions are not compatible the application does not work as expected.

We cannot deny that managing the dependencies is difficult. Spring boot solves this problem by providing dependency-management section.

Spring boot provides starter packages which includes jars and the required versions, so we do not need this anymore 🙂 . It configures the dependency versions based on the release. If we need specific version we can off course specify the version for dependency, However it is not recommended.

Point to remember is that each version of spring boot has different versions. If we upgrade the Spring Boot version, related dependencies will be upgraded automatically.

All Spring Boot starters are named as spring-boot-starter-[starter-name]
eg: spring-boot-starter-web or spring-boot-starter-data-jpa

You can visit starters list to see all available spring boot startes.

2. Application Entry point denoted by @SpringBootApplication:

For project, as it grows, it is difficult to find out the entry point of the project after some times. As a spring boot application is a java application the entry point is Main method. When we give control to string boot by calling SpringApplication.run method, this main method is found and executed. To run() method we need to pass class name which is the primary component and args array. Primary component is the class with @SpringBootApplication annotation.

@SpringBootApplication
public class DemoApplication {
    public static void main(String[] args) {
        SpringApplication.run(DemoApplication.class, args);
    }
}

Note that @SpringBootApplication annotation includes @EnableAutoConfiguration, @ComponentScan and @SpringBootConfiguration annotations. That means if we add @SpringBootApplication annotation these annotations will be added automatically.

We can run spring boot application in different ways. 

  • By using IDE as java application
  • Using building tool like maven as mvn spring-boot:run

We should see the starter banner once the application starts. We can also customize spring-boot start up banner.

3. Auto configuration:

One more problem that every developer has faced while developing a project is that of extensive configurations. Configurations for database, flyway, rest API, security etc. are required in any and all applications. These can be sometimes excessive and time consuming.

But spring-boot resolves this situation too. Spring Boot does the configurations automatically according to the dependencies added. For instance, if we add spring-boot-starter-web dependency to our project, then webserver, servlets etc. will be configured automatically.

We must use @EnableAutoConfiguration annotation to infrom srping boot that auto configuration is requried.

Note: As we read earlier, including @SpringBootApplication annotation will include @EnableAutoConfiguration annotation.

4. Component scan:

One of the most important feature of spring is dependency injection. To detect the classes for auto injection, spring uses special stereotype annotations such as @Component, @Controller, @Service, and @Repository.

In order to create objects of these annotated classes and inject them, spring needs to know where they are located. One way to do that is by using @ComponentScan annotation.

In spring boot application @SpringBootApplication annotation adds @ComponentScan annotation with default setting. Hence by default spring boot scans the annotated classes under the current package. Due to this it is recommended that we put our main class in the root or top most package.

We can also override @ComponentScan annotation to specify packages to scan. If we need to scan paths other than the root package. There are many way to do that, some ways are as below,

@ComponentScan("com.stacktrace.guru")
@ComponentScan({"com.stacktrace.guru.package1","com.stacktrace.guru.package2"})

For more details visit : ComponentScan java doc

5. Externalized configuration

Frequently there are scenarios where some data used in an application is different for different environments. Such as, the port number, where the application is deployed is different for development and production environment. In such cases, hardcoding them in the code could be difficult to manage and change.

Spring boot allows multiple options to externalize this properties. We can use these configured properties using the @Value annotation or by binding properties to objects using @ConfigurationProperties.

Configuration properties can be provided using configuraion files,, command line or system setting.

File configuration can be provided by adding files like application.propertiesapplication.yaml or in the classpath. In general src/main/resources directory is used to store configuration files.

application.properties file example

server.port = 8090
spring.application.name = demo-application

application.yaml file example

spring:
    application:
        name: demo-application
    server:
        port: 8090

Note that:

We can also change the configuration file name by using spring.config.name property.

Config file location can be changed using spring.config.location environment property. 

6. Out of the box spring data jpa support:

Spring data jpa is one of the most important support provided by spring boot. Spring boot provides Spring data JPA using hibernate as default JPA provider. These feature can be enabled by adding just spring-boot-starter-data-jpa dependency and by providing database source. 

Spring Data JPA provides repository abstraction, that means we don’t need to worry about writing implementation of repository classes any more. Just adding meaningful method name in interface is enough.

Fast tract reading

  • Spring boot is most used opensource framework by spring community
  • It helps to create production ready project in easy and simple steps
  • Removes repeated and complex processes
  • Increases productivity-reduce the development time 
  • It supports auto dependency management using Spring Boot starters
  • Auto configures most of the things like database, rest API, security etc
  • It comes with by default support for spring data jpa

Related topics

Nowadays spring boot and spring data are widely used frameworks. If you are building web application in java, spring boot is the first choice. If you have Database then spring data JPA is best choice. In spring boot spring data is the default implementation for database interaction. Spring boot using spring data JPA even creates nested object query from method name.

Therefore, if you are using spring boot or spring data JPA, you must know how queries are created specially if you have nested object structure. 

Introduction

Spring data JPA provides repository abstraction and reduces the boiler plate code from persistence layers. As discussed in our previous blog Spring data Java beginner, we can define queries in two ways, Query annotation and Method name itself.

For simple use cases method name for query resolution is best option. However, using spring boot for nested object property without knowing how it works, could cause big issue at runtime.

Lets understand what could be the problem in nested object query and how can we resolve it.

Problem statement

For example if you create method findByDepartmentId, what will be the query? It would be either,

Select * from ClassRoom where departmentId=?

OR

Select * from ClassRoom c left join department d on <condition> where d.id =?

Both are the possibilities depending on the class structure like

Class ClassRoom {
   Long departmentId;
}

Or

Class ClassRoom {
    Department department;
}
Class Department {
    Long id;
}

Then the big question is, what happens when we have following structure?

Class ClassRoom {
    Department department;
    Long departmentId;
}

Confussed face
Class ClassRoom {
    Department department;
    Long departmentId;
}

How spring data resolves method name

Let's see how spring data jpa in spring boot decides what join should be used to avoid wrong select query.

Consider the object structure as below for these classes : Student- classroom-department

Class Student {
    ...
    ClassRoom classRoom;
}
Class ClassRoom {
    …..
    Department department;
}
Class Department{
    ...
    Long id;
}

We will be using above database structure and try to understand what happens when we create a method findByClassRoomDepartmentId(Long id)

Following are the steps that spring data jpa will perform to create query

  • Start by taking complete name as classRoomDepartmentId under the domain class
  • If this doesnot match split word at camel case part form right side into 2 parts as classRoomDepartment and id
    • Check whether first property matches, take that property and continue for second part- keep building tree
    • If first side does not match, continue to split to next point i.e. classRoom and departmentId
How spring boot resolve nested object query from method name using spring data JPA
Method name to property resolution flow diagram

In most of the cases this works, however this could fail if we have Long classRoomDepartment variable in Student class. JPA will find the first match as classRoomDepartment, it will select and fail because it will try to find id variable inside the classRoomDepartment which is Long class. But as there is no id property inside the Long class and it will fail.

Solution:

To solve such problem, we can use '_' (Underscore) character inside the method name to define where JPA should try to split. In this case our method name will be findByClassRoom_DepartmentId()

Using underscore is not in the java naming best practice, but this is allowed in spring data JPA.

Fast track reading

  • In Spring data Java queries can be defined using Query annotation or Method name
  • For simple cases derived query from method name is best choice
  • We can use method name to derive query for nested object also
  • Spring data jpa starts checking for property from full name and starts breaking at camel case from right to left
  • To avoid the property name confusion ‘_’ (Underscore) character can be used to separate property names

Related topics

Databases form an integral part of computer applications. With it comes considerable amount of database operations and the corresponding code. For huge applications which have large number of tables/entities, these operations or the code is repeated and duplicated to a large extent. Eventually a programmer would like to reduce this duplicate code. Spring framework took up the challenge and provided us with a solution in the form of Spring Data JPA.

Spring Data is one of the most useful feature released by Spring team. JPA stands for Java Persistence API.

Spring Data JPA provides repository abstraction. This means that the common or repetitive code for the repository is generated by Spring data. The programmer need not write that code again and again for all the repositories.
Thus using Spring Data reduces the boilerplate code from persistence layers.

Features of Spring Data can be listed as

  • The Spring Data generates implementation. That means we do not need to implement DAO manually anymore
  • Spring Data JPA reduces the boilerplate code required by JPA
  • That helps to implement persistence layer easier and faster
  • The DAO implementations to be completely removed

Spring Data JPA can be used with a normal Spring application as well as a Spring boot application. We shall look at both ways further in this blog.

4 steps to configure Spring Data JPA:

  1. Extend Repository interface
  2. Declare query methods in the interface
  3. Set up Spring for instantiating these interfaces
  4. Inject these instances for use

1) Extend Repository interface

In order to use Spring data with JPA, our repository or DAO interface must extend JPA specific repository interface.

This will enable Spring data to find our interface and automatically create implementation for it. Thus, our DAO interface can extend Repository interface, JpaRepository interface or any of its sub interface.

Extending sub interface indirectly extends Repository interface.

The Repository interface is the most important interface in Spring Data. It is marker interface. Repository interface takes Domain class and id type as generic type arguments.

Syntax: public interface Repository<T, ID>

T- Domain type, ID- id data type

Example for use of Repository interface

interface StudentRepository extends Repository<Student, Long> { … }

There are some sub interfaces provided by spring data for additional functionalities. Some of the sub interfaces are,

  • public interface CrudRepository<T, ID>: It provides basic CRUD functionalities.
    eg: interface StudentRepository extends CrudRepository<Student, Long> { … }
  • public interface PagingAndSortingRepository<T, ID>: this interface provides paging and sorting functionalities in addition to CRUD operations.
    eg: interface StudentRepository extends PagingAndSortingRepository <Student, Long> { … }

2) Declare query methods on the interface

Once we have created the interface for our entity, it's time to create methods. As discussed, Spring data JPA has a feature that implements repository methods for us. All we have to do is tell Spring data what methods we need.

2 ways to define method in spring data JPA

  1. By deriving the query from the method name 
  2. Manual query using "@Query" annotation

2.1) By deriving the query from the method name

It is as straight forward as the name suggests. All we need to do is, name the method in such a way that it tells what exactly the method wants.

For instance, If we want to fetch data for the Student with department id.
The corresponding method name will be like, 

List<Student> findByDepartmentId(Long departmentId);

As we can see that the method is in plain English and easy to understand.

Assume a Student has a Department object. In Department we have id. In that case, the method creates the property traversal student.department.id.

This method will create following query

select * from Student where departmentId = ?1;

In general our interface will look like below,

interface StudentRepository extends Repository<Student, Long> {
   List<Student> findByDepartmentId(Long departmentId);
}

For this purpose, Spring data has reserved some key words such as, the prefixes find_By, read_By, query_By, count_By, and get_By in the method.

We can also use the keywords such as AND and OR to create qurey with multiple properties of an entity. We also get support for operators such as Between, LessThan, GreaterThan, and Like for the property expressions.

These supported operators can vary by database of choice. So consulting the appropriate part of reference documentation is advised. You can read more at keywords in spring data.

2.2) Manual query using "@Query" annotation

Using meaningful method name for repository sounds very interesting, however sometimes that is not enough. Specially if we need multiple properties in queries or complex query.

We can create method but the name of the method can be very long.

List<Student> findByFirstNameAndLastNameOrderByFirstnameAsc(String firstName,String lastName);

In such cases we can use @query annotation provided by Spring Data. 

@Query("SELECT s FROM Student s WHERE s.firstName =?1 or s.lastName =?2 order by firstName asc)")
List<Student> findByName(String firstName,String lastName);

Using position based parameter (?paramPosition) could be difficult to understand and refactor. This can be avoided by using named-parameters in query. We can use ":paramName" and "@Param" annotation for parameter binding.

@Query("SELECT s FROM Student s WHERE s.firstName = :firstName or s.lastName = :lastName order by firstName asc)")
List<Student> findByName(@Param("firstName")String firstName, @Param("lastName")String lastName);

3) Configuration for spring data JPA

Spring Data JPA can be used in basic spring or spring-boot project. Also the configuration can be done using xml or java classes. For configuration using java class, we need to use @Configuration annotation.

3.1 Spring data JPA configuration in spring boot:

Spring boot is another very famous framework, which make application creation and management very fast and easy. It has auto configuration feature which provides all required dependencies and configuration. We just need to add correct dependencies.

It also auto configures Spring data and hibernate as default JPA. Also it provides all necessary configuration required for spring data according to database used. We just need to add correct database connector dependency and provide data source.

We don't need to do other configuration unless, we need to customize it.

Spring boot configuration using application.properties

spring.datasource.url=jdbc:mysql://localhost:3306/database_name
spring.datasource.username=root 
spring.datasource.password=root

3.2 Spring data JPA configuration in non-spring boot:

To use spring data we need to configure following objects:

  1. DataSource: Database configuration- URL, username, password, driver, etc
  2. EntityManager: Most important object which binds all objects, like entity package, datasource, etc
    1. we can configure entityManager using LocalEntityManagerFactoryBean
    2. we can also configure additional properties using setJpaProperties(properties)
  3. TransactionManager: Configuration for database transaction
Configuration using java code:
@Configuration
@EnableJpaRepositories
@EnableTransactionManagement
class ApplicationConfig {

  @Bean
    public DataSource dataSource(){
        DriverManagerDataSource dataSource = new DriverManagerDataSource();
        dataSource.setUrl("jdbc:mysql://localhost:3306/database_name");
        dataSource.setUsername( "root" );
        dataSource.setPassword( "root" );
        return dataSource;
    }

  @Bean
  public LocalContainerEntityManagerFactoryBean entityManagerFactory() {

    JpaVendorAdapter vendorAdapter = new HibernateJpaVendorAdapter(); 
    LocalContainerEntityManagerFactoryBean entityManager = new LocalContainerEntityManagerFactoryBean();
    entityManager.setJpaVendorAdapter(vendorAdapter);
    entityManager.setPackagesToScan("com.entity.package");
    entityManager.setDataSource(dataSource());
    return entityManager;
  }

  @Bean
  public PlatformTransactionManager transactionManager(EntityManagerFactory entityManagerFactory) {
    JpaTransactionManager txManager = new JpaTransactionManager();
    txManager.setEntityManagerFactory(entityManagerFactory);
    return txManager;
  }
}
Configuration using xml file:

Similar to java code we can configure all necessary objects in xml file

<bean id="entityManager" 
 class="org.springframework.orm.jpa.LocalContainerEntityManagerFactoryBean"> 
    <property name="dataSource" ref="dataSource" />
    <property name="packagesToScan" value="com.entity.package" />
    <property name="jpaVendorAdapter">
        <bean class="org.springframework.orm.jpa.vendor.HibernateJpaVendorAdapter" /> 
   </property>
 </bean>

<bean id="dataSource" 
  class="org.springframework.jdbc.datasource.DriverManagerDataSource">
    <property name="url" value="jdbc:mysql://localhost:3306/database_name" />
    <property name="username" value="root" />
    <property name="password" value="root" />
</bean>

<bean id="transactionManager" class="org.springframework.orm.jpa.JpaTransactionManager">
    <property name="entityManagerFactory" ref="entityManager" />
</bean>

<tx:annotation-driven />
<bean id="persistenceExceptionTranslationPostProcessor" class= 
"org.springframework.dao.annotation.PersistenceExceptionTranslationPostProcessor" />

4) Inject the repository instance for use

Once all the above steps are done we are ready to use. Now we just need to instantiate and use use the interfaces.

We can do that using spring basic features like dependency injection using @Autowired annotation.

class StudentService{ 

@Autowired 
private final StudentRepository studentRepository;
  
  public List<Student> findByDepartmentId(Long departmentId) {
    return studentRepository.findByDepartmentId(departmentId);
  }
} 

Fast track reading

  • Spring Data JPA is one of the most useful feature released by Spring team
  • Using Sping data JPA repository implementation can be completely removed
  • Can be used with core spring or spring boot application
  • Should extend  JPA specific Repository interface or it's sub interface
  • Required method can be declared using meaningful name or using @Query annotation
  • Configuration can be done using xml file or in java code

Related topics

String manipulation is done most often while programming. Like removing spaces in or around the string text. This also known as 'strip'ping off spaces in the string. So up till now we are all aware of the different ways to remove spaces from string in java, namely trim, replaceAll. However, java 11 has made some new additions to these with methods like, strip, stripLeading , stripTrailing.

Majority of the times, we just use the trim method for removing spaces. We never stop and think is there may be a better way to suit our need? Sure, trim() works well for most of the cases, but there are many different methods in java. Each having its own advantages and disadvantages. How do we decide which method suits us best?

Well, in this blog we shall cover the different methods in detail.

    Different ways to remove spaces from string in java

  1. : Removing leading and trailing spaces from the string
  2. :(from java 11) Removes leading and trailing spaces from the string. Strip method is Unicode charset aware meanse it removes spaces haveing different unicode
  3. : Differences between trim and strip method
  4. :(from java 11) Removes white spaces only from the beginning of the string
  5. :(from java 11) Removes white spaces only from ending of the string
  6. : Replaces all target characters with new character. It will replace or remove all spaces leading, in between and trailing
  7. : Replaces all matched characters with new character. This method takes regular expression as input to identify target substring that needs to be replaced. It can be used to remove any conbination of spaces.
  8. : Differences between replace and replaceAll method
  9. : Replaces only first occurrence of target substring with new replacement string

Most important point to note is that in java a string object is immutable. It means we cannot modify a string, hence all the methods returns new string with all the transformations.

If you need to remove leading and trailing spaces the best option would be before java 11 trim() and from java 11 strip() method.

trim() method in java

trim() is the most commonly used method by java developers for removing leading and trailing spaces. For trim method space character means any character whose ASCII value is less than or equal to 32 (‘U+0020’).

Example of trim method to remove spaces:

public class StringTrimTest {

    public static void main(String[] args) {
        String string = "    String    with    space    ";
        System.out.println("Before trim: \"" + string +"\"");
        System.out.println("After trim: \"" + string.trim() +"\"");
   }
}

In CommandLineRunnerImpl  

status=running 

Before trim: "    String    with    space    "
After trim: "String    with    space"

strip() method Java 11

In the release of Java 11 new strip() method was added to remove leading and trailing spaces from String.

This method was added as there are various space characters according to Unicode standards having ASCII value more than 32(‘U+0020’). Ex: 8193(U+2001).

To identify these space characters, new method isWhitespace(int) was added from Java 1.5 in Character class. This method uses unicode to identify space characters. You can read more about unicode space characters here.

The strip method uses this Character.isWhitespace(int) method to cover wide range of white space characters and remove them.

Example of strip():

public class StringStripTest {
    public static void main(String[] args) {
        String string = "    String    with    space    ";
        System.out.println("Before strip: \"" + string+"\"");
        System.out.println("After strip: \"" + string.strip()+"\"");
    }
}

In CommandLineRunnerImpl  

status=running 

Before strip: "    String    with    space    "
After strip: "String    with    space"

Difference between trim and strip method in java

trim()strip()
From Java 1From Java 11
Uses codepoint(ASCII) valueUses Unicode value
Removes leading and trailing character(space)Removes leading and trailing character(space)
Removes characters having ASCII value less than or equal to ‘U+0020’ or '32'Removes all space characters according to unicode

Let's look at the example where we will use white space character higher than 32 (‘U+0020’) unicode.

public class StringTrimVsStripTest {
    public static void main(String[] args) {
        String string = '\u2001'+"String    with    space"+ '\u2001';
        System.out.println("Before: \"" + string+"\"");
        System.out.println("After trim: \"" + string.trim()+"\"");
        System.out.println("After strip: \"" + string.strip()+"\"");
   }
}

Output:

Before: " String with space "
After trim: " String with space "
After strip: "String with space"

In the above example we can see that trim method is unable to remove space character added by '\u2001' unicode character.

Note: If you are running on windows machine, you may not be able to see the similar output due to limited unicode set. You can use online compilers to run program. Some online compiler links are as below,
Java-8: https://www.jdoodle.com/online-java-compiler/
Java-11: https://www.tutorialspoint.com/compile_java_online.php

stripLeading() method Java 11

Added in Java 11, stripLeading() method removes all leading spaces from a String.

Similar to strip method stripLeading also uses Character.isWhitespace(int) for identifyng white spaces.

public class StringStripLeadingTest {
    public static void main(String[] args) {
        String string = "    String    with    space    ";
        System.out.println("Before: \"" + string+"\"");
        System.out.println("After : \"" + string.stripLeading()+"\"");
    }
}

Output:

Before: "    String    with    space    "
After : "String    with    space    "

stripTrailing() method Java 11

Added in Java 11, stripTrailing() method removes all ending spaces from a String.

Similar to strip method stripTrailing also uses Character.isWhitespace(int) for identifying white spaces.

public class StringStripTrailingTest {

    public static void main(String[] args) {
      String string = "    String    with    space    ";
      System.out.println("Before: \"" + string+"\"");
        System.out.println("After : \"" + string.stripTrailing()+"\"");
    }
}

Output:

Before:"    String    with    space    "
After :"    String    with    space"

replace(CharSequence target, CharSequence replacement):

Added from java 1.5, This method is used to replace each target substring with the specified replacement string.

This method replaces all matching target elements. Hence replace() method can be used to remove all spaces from a string.

Note: One more method replace(char oldChar, char newChar) is present in java string class. The only differences is that this method takes single character as target and replacement. We cannot use this method to remove space, because we cannot have empty character as replacement.

Example to remove all spaces from string

public class StringReplaceTest {
 
    public static void main(String[] args) {
        String string = "    String    with    space    ";
        System.out.println("Before : \"" + string + "\"");
        System.out.println("Replace: \"" + string.replace(" ", "") + "\"");
    }
}

Output:

Before  : "    String    with    space    "
Replace : "Stringwithspace" 

replaceAll (String regex, String replacement)

Added in java 1.4, this is one of the most powerful method for string manipulation. We can use this method for many purposes.

Using replaceAll() method we can replace each matching regular expression substring with the given replacement string. For example for removing all spaces, removing leading spaces, removing trailing spaces and so on.

We just need to create correct regular expression with correct replacement parameter. Some regular expression examples as below:

\s+Find all space
^\s+Find all spaces at line beginning
\s+$Find all spaces at line ending

Example to replacing spaces in string,

Note: In java to add '/'(slash) we have to use escape character so for "\s+" we have to use "\\s+"

public class StringReplaceAllTest {
    public static void main(String[] args) {
        String string = "    String    with    space    ";
        System.out.println("Before replaceAll : \"" + string+"\"");
        System.out.println("Replace all space : \"" + string.replaceAll(" ", "") + "\"");
        System.out.println("Replace all regex : \"" + string.replaceAll("\\s+", "") + "\"");
        System.out.println("Replace leading   : \"" + string.replaceAll("^\\s+", "") + "\""); 
        System.out.println("Replace trailing  : \"" + string.replaceAll("\\s+$", "") + "\"");
    }
}

Output:

Before replaceAll : "    String    with    space    "
Replace all space : "Stringwithspace"
Replace all regex : "Stringwithspace"
Replace leading   : "String    with    space    "
Replace trailing  : "    String    with    space"

As we can see that replaceAll() is pretty powerful method if we use it with proper regular expression.

Difference between replaceAll and replace method

replaceAll()replace()
From Java 1.4From Java 1.5
Accepts regular expression for target identificationAccepts string for target identification
Used for fix or dynamic string replacementUsed for fix string replacement
Removes characters having ASCII value less than or equal to ‘U+0020’ or '32'Removes all space characters according to unicode

replaceFirst(String regex, String replacement)

Added in java 1.4, replaceFirst method replaces only the first match of given regular expression with replacement string.

This method can be very useful if you just need to replace only one first occurrence. For example if we just need to remove leading spaces we can use "\\s+" or "^\\s+".

We can also use this method to remove trailing spaces by using "\\s+$" regular expression. As this expression will only match the last spaces in line. So last spaces are considered as the first match for this method.

Let's take an example for removing leading and trailing spaces from string

public class StringReplaceFistTest {
      public static void main(String[] args) {
      String string = "    String    with    space    ";
      System.out.println("Original text        : \"" + string+"\"");
        System.out.println("Updated text         : \"" + string.replaceFirst("space", "update") + "\"");
        System.out.println("Remove leading  space: \"" + string.replaceFirst("\\s+", "") + "\"");
        System.out.println("Remove trailing space: \"" + string.replaceFirst("\\s+$", "") + "\"");    }
}

Output

Original text        : "    String    with    space    "
Updated text         : "    String    with    update    "
Remove leading  space: "String    with    space    "
Remove trailing space: "    String    with    space"

Fast track reading :

Related topics

Java 8 Optional is used to represent Optional object or empty value instead null reference. This will help to avoid null pointer exception which occurs when we try to perform some operation on null reference object. For accessing the value from optional object, there are few methods like get(), orELse(), orElseGet(), etc. Whenever we look at orElse vs orElseGet() method, we always get confused. What is the difference and when to use which method?

When we overview these methods, we think that we can use orElse(functionCall()) instead of orElseGet(Class::functionDef), and it will have the same outcome. Then why is there a need to create two different methods?

The straight answer is there is difference in the behaviors and they make huge difference in case of performance, for instance orElse() method returns value and orElseGet() method calls the function.

Let us see each of their behavior in detail in this blog.

Syntax of orElse vs orElseGet

OrElse() method takes a parameter which will be returned if the optional doesn’t have value.
OrElseGet() method needs a function which will be executed to return value if the optional doesn’t have value.

This shows that orElse method needs a value and orElseGet method needs supplier functions.

If we pass function to orElse method it will always be executed to fit the syntax before executing the statement. However, in case of orElseGet method we cannot pass value and the function is executed only if optional doesn’t have value.

Difference: orElse vs orElseGet

We will use following function to get value if optional is null

public String getFunctionForTest() { 
   System.out.println("\n ===== function called ===== "); 
   return "default value"; 
} 

Let's take scenario of Optional object has null value

public void orElseVSorElseGet() {
       Optional<String> optional = Optional.ofNullable(null);
 
       String orElseGetResult = optional.orElseGet( this::getFunctionForTest); 
        System.out.println("value in orElseGetResult " + orElseGetResult); 
 
        String orElseResult = optional.orElse(this.getFunctionForTest()); 
        System.out.println("value in orElseResult " + orElseResult); 
}

Output:

 ===== function called =====
value in orElseGetResult default value 

===== function called =====
value in orElseResult default value

As we can see that the option doesn’t have value and we need to take value form else part. So as expected, the function is called in both cases.

Now let's take an example where we have the value in optional object and we don’t need to execute else part

public void orElseVSorElseGet() { 
       Optional<String> optional = Optional.ofNullable("value found"); 

    String orElseGetResult = optional.orElseGet(this::getFunctionForTest); 
       System.out.println("value in orElseGetResult " + orElseGetResult); 
 
       String orElseResult = optional.orElse(this.getFunctionForTest()); 
        System.out.println("value in orElseResult " + orElseResult); 
} 

Output:

value in orElseGetResult default value

 ===== function called =====
value in orElseResult default value

As we know that the option object has a value, so we don’t need to take value form else part.

So we expect that function should not be executed. However the function was executed in the case of orElse method.

In the above example we may not notice the performance difference, but when we have complex process to take default value it affects performance. You can consider the example where you need database or network call to take default values it will be slower even if you have value.

In such cases it's better to use orElseGet method.

In case of orElse, else part is computed even if value is present. If we have default static value then orElse is good choice. If you need a computation logic for default value we should use orElseGet.

Fast track reading

  • OrElse method in optional takes a parameter
  • OrElseGet method in optional needs a supplier function
  • In case of orElse method, else part is computed even if value is present
  • In case of orElseGet method, else part is computed only if Optional object is empty
  • For fixed value orElse method should be used
  • If we need to compute value at run time we should use orElseGet

Related topics

Hey guys! After our previous blog on difference between thenReturn and thenAnswer mockito methods, we are back with yet another interesting blog on Mockito. Here, we shall discuss "How to Mock Void method with Mockito". Let's get started!

When writing code, there is always at least one method that returns 'void', and at some point in time we need to mock 'void' method. So how do we go about it? Let us together figure this out in the following blog using mockito.

Mockito is one of the most famous mocking framework used for writing unit tests. If you are new to mocking you can know more at mockito website.

In this blog we will cover,

Why we need to mock void method?

Let's assume we have a method. In this method we call another void method. Now, when you want to write test case for this method, how can we test that the void method was called? Also, if the correct parameters were passed to void method?
In this case mockito comes to our rescue.

Let's take an example, we have a UserService class. In this class we have a updateName() method.

public UserService{
    ...
   public void updateName(Long id, String name){
      userRepository.updateName(id, name);
   }
}

Now, we want to write unit test for UserService class and mock userRepository.
But the only thing we need to verify in this test case is that updateName() method from userRepository is called with correct set of parameters.
For this purpose we need to mock updateName() method, capture the arguments and verify the arguments.

One of the most important point to note here is that, we can not just mock void method using when-then mechanism of mockito. Because, when() method of mockito works with return value and does not work when method is void.

How to mock void method in mockito?

In Mockito we can use different methods to call real method or mock void method. We can use one of the options as per requirements

  1. doNothing() : Completely ignore the calling of void method, this is default behavior
  2. doAnswer() : Perform some run time or complex operations when void method is called
  3. doThrow() : Throw exception when mocked void method is called
  4. doCallRealMethod() : Do not mock and call real method

1) Using doNothing()

If we just want to completely ignore the void method call, we can use doNothing().

In mocking, for every method of mocked object doNothing is the default behavior. Hence, if you don't want to verify parameters, use of doNothing is completely optional. Following all codes perform similar behavior,

Example using doNothing() for void method

@Test
public void testUpdateNameWithDoNothingVerifyRepositoryCall() {
   doNothing().when(mockedUserRepository).updateName(anyLong(),anyString());

   userService.updateName(1L,"void mock test");
	
   verify(mockedUserRepository, times(1)).updateName(1L,"void mock test");
}

Without using doNothing() for void method

@Test
public void testUpdateNameWithOutDoNothingVerifyRepositoryCall() {

   userService.updateName(1L,"void mock test");
	
   verify(mockedUserRepository, times(1)).updateName(1L,"void mock test");
}

Example of argument capture using doNothing()

We can do different things with argument capture. Here, we will just verify the captured value

@Test
public void testUpdateNameUsingArgumentCaptor() {

   ArgumentCaptor<Long> idCapture = ArgumentCaptor.forClass(Long.class);
   ArgumentCaptor<String> nameCapture = ArgumentCaptor.forClass(String.class);
   doNothing().when(mockedUserRepository).updateName(idCapture.capture(),nameCapture.capture());
 
   userService.updateName(1L,"void mock test");
	
   assertEquals(1L, idCapture.getValue());
   assertEquals("void mock test", nameCapture.getValue());
}

2) Using doAnswer() for void method

If we do not want to call real method, however need to perform some runtime operation doAnswer is used.

Let's take an example of doAnswer where we will print and verify the argument using doAnswer

@Test
public void testUpdateNameUsingDoAnswer() {
   doAnswer(invocation -> {
      long id = invocation.getArgument(0);
      String name = invocation.getArgument(1);
      System.out.println("called for id: "+id+" and name: "+name);

      assertEquals(1L, id);
      assertEquals("void mock test", name);

      return null;
}).when(mockedUserRepository).updateName(anyLong(),anyString());

   userService.updateName(1L,"void mock test");
   verify(mockedUserRepository, times(1)).updateName(1L,"void mock test");
}

3) Throw exception using doThrow()

If we want to throw an exception when method is called, we can use doThrow() method of mockito.

Let's take an example where we will throw InvalidParamException when updateName() method is called with null id.

@Test(expected = InvalidParamException.class)
public void testUpdateNameThrowExceptionWhenIdNull() {
   doThrow(new InvalidParamException())
      .when(mockedUserRepository).updateName(null,anyString();
   userService.updateName(null,"void mock test");
}

4) Real method call using doCallRealMethod()

Sometimes it is necessary to call the real method from mocked object, in such case we need to use doCallRealMethod(), because doNothig() is the default behavior.

In the following example real method from userRepository will be called even though it is a mocked object.

@Test
public void testUpdateNameCallRealRepositoryMethod() {

   doCallRealMethod().when(mockedUserRepository).updateName(anyLong(), anyString());
 
   userService.updateName(1L,"calling real method");
 
   verify(mockedUserRepository, times(1)).add(1L,"calling real method");
}

Fast track reading

Reference:

Related Topics:

Whenever we start a Spring Boot application a text message shown below is displayed . This is called as a banner.

spring boot startup banner

Now, wouldn't it be wonderful if we could create a custom banner which is specific to our Spring Boot application and use it instead of default Spring Boot banner.

There are many ways to generate and use spring boot custom banner.

We will cover following topics in detail,

  1. Custom spring boot banner generator and generation
  2. Configure spring boot application to use custom banner
  3. Disable spring boot banner

1. Custom spring boot banner generator and generation

For showing the custom banner at application startup we need a banner.
We can create custom banner by our self in text file, can create programatically or use various online free tools.
We can have banner in plain text file by using the Ascii charters or in image format.

The banner in the plain text format is faster to load and easier to maintain. So in this blog we will be using text banner but you can use as per your choice.

1.1 Spring boot custom banner online generator:

There are so many Ascii banner generator tools are available online like,

1.2 Programmatic banner generation:

Spring boot framework provides a Banner interface that allows us to create banners.
We need a class that implements Banner interface and overrides printBanner() method for configuring custom banner.

import java.io.PrintStream;
import org.springframework.boot.Banner;
import org.springframework.core.env.Environment;
public class CustomBanner implements Banner {
	@Override
	public void printBanner(Environment arg0, Class<?> arg1, PrintStream arg2) {
		arg2.println("###############################");
		arg2.println("###### Spring boot banner ######");
		arg2.println("###############################");
	}
}

The most important thing to note is that, the banner configured in printBanner() method will only be used if we do not have configured banner in properties or banner file.

In the banner, we can use following placeholders for dynamic values.

VariableDescription
${application.version} Displays application version number
e.g. 1.0
${application.formatted-version}Displays application version number with bracket and v
e.g. (v1.0)
${spring-boot.version} Displays Spring Boot version
e.g. 2.2.7.RELEASE
${spring-boot.formatted-version}Displays Spring Boot version with bracket and v
e.g. (v2.2.7.RELEASE)
${application.title}Displays application titleas declared in MANIFEST.MF.
e.g. MyApp.

2. Configure spring boot application to use custom banner

After the banner is generated, we need to make it available for application to use.
By default spring boot uses file named banner.txt or banner.(png|jpg|gif) in the src/main/resources directory.

We can store at this location the file with name banner.txt.
We can also store in different location with any file name.

If we decide to store in other than src/main/resources/banner.txt, we need to configure the file location so that application can use it.

2.1 We can configure using following properties:

spring.banner.image.location=classpath:custom-banner.png
spring.banner.location=classpath:/path/bannerfile.txt

2.2 Configure banner by a program:

We can configure banner in SpringApplication class using setBanner() method.

@SpringBootApplication
public class BootApplication {  
    public static void main(String[] args) {
	SpringApplication application = new SpringApplication(BootApplication.class);
	application.setBanner(new CustomBannner());
	application.run(args);
    }
}

3. Disable spring boot banner

If you don't want the banner it is also possible to disable the banner.
In spring boot, we can disable the banner using configuration file or via a program.

Disabling banner using configuration file is the most flexible and recommended way as is easier and can be reverted easily if required.

3.1 Disable using configuration file:

Spring boot supports multiple ways to configure the application. Like using application.properties, application.yaml file.

3.1.1 Disable banner using application.properties file:

If we add following line to application.properties file the startup banner will be disabled

spring.main.banner-mode=off

3.1.2 Disable banner using application.yaml file:

If we add following lines to application.yaml file the startup banner will be disabled

spring:
  main:
    banner-mode:"off"

3.2. Disable banner from application code:

In spring boot code we can configure application using SpringApplication or SpringApplicationBuilder. We can also use java 8 features lambda expression in sring boot application.

3.2.1 Disable banner using the SpringApplication:

SpringApplication app = new SpringApplication(MyApplication.class);
app.setBannerMode(Banner.Mode.OFF);
app.run(args);

3.2.2 Disable banner using the SpringApplicationBuilder:

new SpringApplicationBuilder(MyApplication.class)
    .bannerMode(Banner.Mode.OFF)
    .run(args)

Fast track reading

  • Banner is a fancy text message displayed at spring boot application start up
  • We can create custom banner our self or generate using online free tools
  • Banner can be in a text or image format
  • Text format banner is faster to load
  • Spring boot banner can have placeholders for dynamic values
  • We can also disable spring boot banner

References:

Other Topics

When it comes to writing test cases for code, Mockito is one of the most common choices of developers. Then we face the question, how to use thenReturn() and thenAnswer() methods of Mockito? If you are facing this also, don't worry every one faces or has faced this question and we are here to solve it!! So, get set go...

Mockito is one of the most famous mocking framework for testing. Let us assume you already know about mockito. If not you can visit official mockito website before we proceed.

In Mockito insead of calling real method you can specify what to return or do when the method is called. This is called as the "Mocking".
There are different ways to specify mocked behavior. The most common ways are using thenReturn() and thenAnswer() methods.

Most of the times thenReturn() is used(which is fine) but some times we need to use thenAnswer().

When we should use thenReturn and when thenAnswer?

The simplest answer is - if you need fixed return value on method call then we should use thenReturn(…)
If you need to perform some operation or the value need to be computed at run time then we should use thenAnswer(…)

Let's look at the examples

Let's assume we need to return string value “Mockito” on getName() method call.

Mockito.when(mock.getName() ).thenReturn(“Mockito”)

If we need to return system time when we call getCurrentTime method we need

Mockito.when (mock.getCurrentTime() ).thenAnswer(I -> new Date() );

Now let's get into detail

Method thenReturn() needs a fixed object which will be returned when we call the method.
We can pass any type of object or value, the same value will be returned on method call.

Syntax: OngoingStubbing<T> thenReturn(T value);

Method thenAnswer needs the object of class implementing interface org.mockito.stubbing.Answer.
Answer is the functional interface having method answer(..)
The method answer() will be invoked when we call mocked method from mocked object.
We can use java 8 lambda feature for implementation of answer method.

Syntax: OngoingStubbing<T> thenAnswer(Answer<?> answer);

Basic difference between both is that thenRetun() will always return the same object.

Method thenAnswer will call the method from object every time we invoke the mocked method.

We can also pass function to thenRetun() for defining return value.
There can be 2 scenarios when we use thenAnswer or thenRetun with function.

  1. If function has fix return value, then there will be no difference in the result
    eg. thenReturn(getUserName() );
    And
    thenAnswer(I -> getUserName() ); will function similar
  2. If the return value is computed at run time depending on some parameters the there can be the different results
    eg. thenReturn(getCurrentTime() );
    And
    thenAnswer(I -> getCurrentTime() );

(I) When function returns fixed value

Let's look at the example below, we have a method getName() to test in user class.
We will create a UserTest class for testing. Then we will mock getName() method.

Public class User { 
  public String getName() {
    return this.name;
  }
} 

 // This is the test class which will test the User class
public class UserTest {

  private String dummyName() {
    System.out.println(" #dummyName called");
    return "Java"; 
 }

@Test
public void thenReturnTest() throws Exception { 
  Tester mock = Mockito.mock(User.class); 
  
  System.out.println("------ Using: thenReturn------ "); 
  Mockito.when(mock.getName()).thenReturn(dummyName());
  
  System.out.println(" -- method calls");   
  System.out.println("Call.1 : " + mock.getName()); 
  System.out.println("Call.2 : " + mock.getName());  
  } 
  
@Test 
public void thenAnswerTest() throws Exception { 
  Tester mock = Mockito.mock(User.class); 

  System.out.println("------ Using: thenAnswer------ "); 
  Mockito.when(mock.getName()).thenAnswer(i -> dummyName()); 

  System.out.println(" -- method calls"); 
  System.out.println("Call.1 : " + mock.getName()); 
  System.out.println("Call.2 : " + mock.getName());
  } 
} 

// OUTPUT:

—— Using: thenReturn——
— #dummyName called
— method calls
Call.1 : Java
Call.2 : Java
—— Using: thenAnswer——
— method calls
— #dummyName called
Call.1 : Java
— #dummyName called
Call.2 : Java

In the above example, we can see that getName() method returns same value in both the cases. However, the printed messages are different.
In case of thenRetun() use dummyName() method was executed before the actual call.

This is because as discussed above thenReturn() needs value hence at the time of initialization it is executed and returned value is used.

Also #dummyName called is printed twice in case of thenAnswer(). This is because every time we call mocked method, the function is executed.

(II) Return value is computed at run time

Let's look at the example below, we have a method getTime() to test in user class.
We will create a UserTest class for testing. Then will mock getTime() method.

Public class User { 
  public String getTime() {
     return this.time;
  }
} 

public class UserTest {

  private String now() {
       Calendar now = Calendar.getInstance();
       return now.get(Calendar.MINUTE) + " : " + now.get(Calendar.SECOND);
  }
  private String dummyGetTime() {
       System.out.println(" #getTime called");
       return now();
  }
  
@Test 
public void thenReturnTest() throws Exception { 
     Tester mock = Mockito.mock(User.class); 
 
     System.out.println("------ Using: thenReturn------ "); 
     Mockito.when(mock.getTime()).thenReturn(dummyGetTime()); 
  
     System.out.println(" -- method calls");
     System.out.println("Call.1> " + mock.getTime()+ " called at - " +now());

     TimeUnit.SECONDS.sleep(5); 
     System.out.println("Call.2> " + mock.getTime()+ " called at - " +now());
  } 
  
@Test 
public void thenAnswerTest() throws Exception {
     Tester mock = Mockito.mock(User.class); 

     System.out.println("------ Using: thenAnswer------ ");
     Mockito.when(mock.getTime()).thenAnswer(i -> dummyGetTime());
  
     System.out.println(" -- method calls"); 
     System.out.println("Call.1> " + mock.getTime()+ " called at : " +now());

     TimeUnit.SECONDS.sleep(5); 
     System.out.println("Call.2> " + mock.getTime()+ " called at : " +now());
  } 
} 

// OUTPUT: >

------ Using: thenReturn------
-- #getTime called
-- method calls
Call.1> 4 : 22 called at- 4 : 22
Call.2> 4 : 22 called at- 4 : 27
------ Using: thenAnswer------
-- method calls
-- #getTime called
Call.1> 4 : 22 called at- 4 : 22
-- #getTime called
Call.2> 4 : 27 called at- 4 : 27

In the above example, we can see that getTime() method returns different values in case of thenAnswer() but same value in case of thenRetun().
In case of thenRetun() the value is calculated from now() method i.e. 4:22. This value is used in thenReturn() method every time getTime() function is called.

In case of thenAnswer(), every time we call mocked method getTime(), now() method is also called and returns the new value.

Performance impact

If the method returns simple fixed value we may not see any performance difference. However, if the method has database or network calls, there could be big performance difference.
If value is fixed then we should preferably use thenReturn() as this will only execute once.

Conclusion

We can conclude that the thenReturn() always returns same value whereas thenAnswer() returns the real time computed value.

Fast track reading

Most of the java developers get confused when it comes to the question that, is Java 'pass-by-value' or 'pass-by-reference'.

The answer is that Java is pass-by-value. We will verify that in this blog under the section Pass-by-value for Object data types. Before jumping straight to the conclusion, let's understand in detail how different variables work in java.

Common mistake done by Java developers

There is one most common mistake that java developers do. They try to update object value using "=" or "new" keyword.

Let's look at an example where we want to change the color of box and square a number.

// Wrong - this will not return the updated value to calling method

public void changeToPink(Box boxToChange){

boxToChange = new Box("Pink");

}

public void square(int value){

value   =  value*value;

}

Topics we will be discussing

What is pass-by-value?

Passing variable by value means the value of the variable is copied into another variable. This copies the data into new memory.

Hence modifying new variable only updates the copy. The original variable value is not changed.

We will look in detail with examples later in this blog.

What is pass by reference?

Passing variable by reference means actual object reference or pointer is passed.

This means modifying the new reference object will update the original object.

Pass-by-value in java for primitive data types

Primitive variables are not objects. So primitive data types are pass-by-value. Which means only value is passed to new variable.

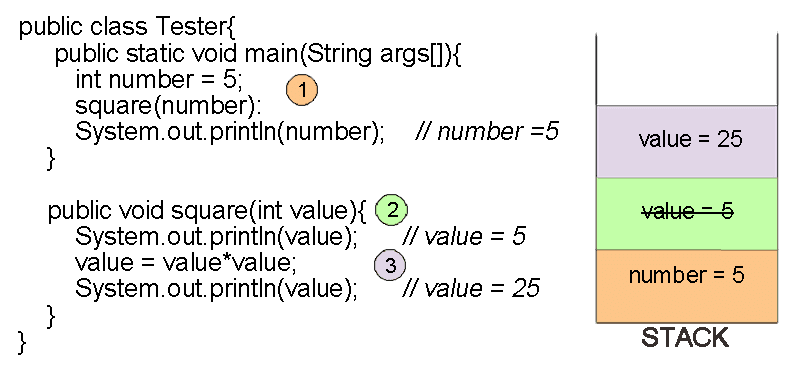
Lets look at the example for better understanding

objects references in stack for pass by value

In the above code we can see that the value of number variable is 5. Then we call the square function.

Even after calling the square function value of number variable is 5 and does not change. Because, we just updated the local(new) variable in square function. This local variable is created in the scope of the function and hence the original number variable is not updated.

How to update primitive parameter from function call?

The only way to update the original primitive variable is by returning value from the function.

Following code will update the value of number variable after calling the function.

public class Tester{
  public static void main(String args[]){
    int number = 5;         // number =5
    number = square(number):
    System.out.println(number); // number = 25
  }

  public int square(int value){
    value = value*value;    // value= 25
    return value;
  }
}

How objects are updated?

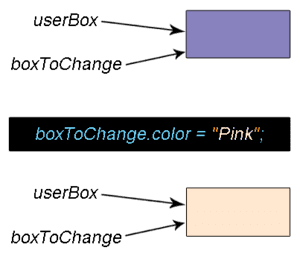
If we update the properties of object using any reference variable, values of all reference variables are updated.
In other words if you update the object not the reference variable then original object is updated.

Example if we use following code to update the color of object userBox

public class Box{ 
  String color;
    Box(String color){
    this.color = color;
  }
}

public class Tester{
  public static void main(String args[]){
    Box userBox = new Box("Purple");
    changeToPink(userBox);
    System.out.println(userBox);   // Pink 
  } 
  public static void changeToPink(Box boxToChange){
    System.out.println(boxToChange);    // Purple 
    boxToChange.color="Pink"; 
    System.out.println(boxToChange);     // Pink
  }	
}
Block diagram for object reference

Using above method the object userBox in main method is also updated to pink color.

Pass-by-value in java for Object data types

In java even objects are pass by value. In fact it is passing reference as value. Even if it sounds confusing don't worry, we can explain it.

In java every object has reference variables. So when we pass object to another function the reference variable is passed. So the references to the actual object is copied.
Now two different reference variables point to the same object. Point to be noted here is that we have two different reference variables.

public class Box{ 
  String color;
  Box(String color){
    this.color = color;
  }
}

public class Tester{ 
  public static void main(String args[]){ 
    Box userBox = new Box("Purple");
    changeToPink(userBox);
    System.out.println(userBox);   // Purple
  }

  public void changeToPink(Box boxToChange){
    System.out.println(boxToChange); // Purple
    boxToChange = new Box("Pink"); 
    System.out.println(boxToChange); // Pink
  }
}
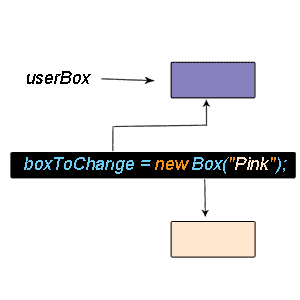
New object workflow

In the above code we have object userBox with color "purple". Now call the function changeToPink(). Even after calling the function changeToPink(), color of the user box remains "Purple".

When you use new keyword new object is created. The new box with pink color is stored in local/new variable(boxToChange). Original object userbox remains with old color purple.

Conclusion

As we can see that the updated reference variable does not update the original object. So we can say when we call the function new reference to same objecect is created, so only reference address is passed as value .

Fast track reading

Related topics